Total Pageviews

Thursday, December 5, 2013

Meal Of The Month: Turkey Left Over Ideas from Funky to Fancy


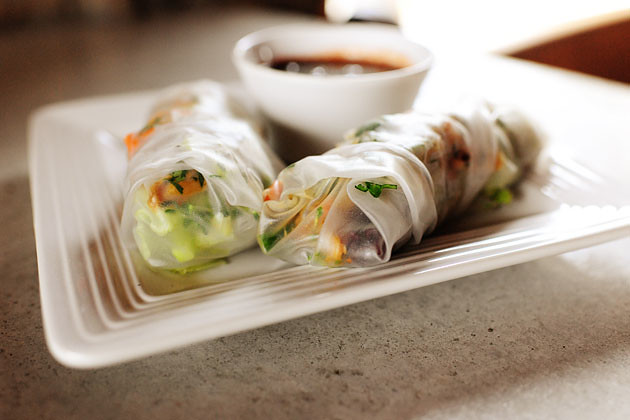
FUNKY: Turkey Spring Rolls
(Thank You Ree Drummond from the Food Network for the recipe)

Ingredients:
2 cups shredded leftover Thanksgiving turkey
3 tablespoons soy sauce
1 teaspoon sesame oil
1 teaspoon rice vinegar
1/2 teaspoon hot chile oil
1 package cellophane noodles
Eight 8 1/2-inch rice paper wrappers
3 leaves green-leaf lettuce, torn into pieces
1/2 cup alfalfa sprouts
1 carrot, cut into julienne
1 cucumber, cut into julienne
3 tablespoons finely chopped fresh cilantro

Dipping Sauce:
1 cup leftover cranberry sauce
2 tablespoons soy sauce
Hot chile oil

Directions
Place the turkey in a bowl and drizzle in the soy sauce, sesame oil, rice vinegar and the hot chili oil. Stir to combine and give it a taste. If you'd like a stronger flavor, add a little more of any of the ingredients.

Next, place the cellophane noodles in a large bowl. Cover them with boiling water and let them sit according to the package directions.

When they are tender but still have a nice bite, drain and set the noodles aside.

Soften the rice paper wrappers by placing them one by one into a bowl of warm water and taking them out when they're soft but still hold together.

To assemble each spring roll, lay a wrapper on a plate. Lay a small line of noodles in the center. Add a small amount of lettuce, turkey, alfalfa sprouts, a few carrot and cucumber strips, and top with a sprinkling of cilantro.

Fold in the sides of the wrappers and roll it into a tight roll. Repeat to make the rest of the rolls.

For the dipping sauce: Combine the cranberry sauce, soy sauce and a few dashed chile oil.

Dip the rolls into the sauce and dig in! Best if eaten within 1 hour of preparing.
Ree Drummond

FANCY: Leftover Turkey Pate

Ingredients:


  • 14oz cold cooked turkey
  • 1 large onion, chopped
  • 3oz butter
  • 4 tablespoons single cream (or light cream)
  • 2 tablespoons dry sherry
  • chopped parsley
  • salt and black pepper
  • lemon (as a garnish)
  • Directions

    1. Melt the butter in a saucepan, add the onion and fry until transparent.
    2. Remove pan from the heat and add the turkey meat.
    3. Place the mixture in a food processor and finely chop.
    4. Add the cream and sherry and beat until it is a smooth consistency.
    5. Place the mixture into a serving dish or individual ramekins and chill in the fridge for at least 3 hours.
    6. To serve, sprinkle with chopped parsley and place a lemon slice twist on top.

  • Celebrate Food Tip:
  • For this recipe, you can place some of your leftover, cooked turkey in the freezer to have on hand in case you have unexpected holiday company or if you have to bring something to a soiree!


Tuesday, November 26, 2013

Everyday Hair Gourmet!

Turn your bathroom into a salon with a trip to pantry (or fridge)!  Try this wonderful list of at-home hair treatments we have compiled for you.

1) Carrots:  Who would have thunk it?! If you have scarlet locks, you can revitalize and deepen your color with this produce staple!  Cut 2 large carrots into big chunks and boil in 2 cups water.  Turn down the heat and simmer until the water has a lovely orange glow.  Cool the water and remove the carrot chunks (We dying to know what would happen if you pureed it and used it as a hair mask including the carrot chunks!).  Pour the carrot water over dry hair.  Put on your favorite shower cap and wait 20 minutes.  Rinse and then use a mild shampoo and conditioner.  You'll look as radiant as your Christmas Tree!

2) Milk:  Add 1 tsp honey to 2 cups of warm milk.  If you have coarse hair use whole milk and if you have fine hair use skim milk!  Mix the ingredients until the honey dissolves and pour over dry hair.  After 15 minutes rinse with warm water and shampoo and condition as usual.

3) Almond Oil:  Frizzy hair?  This tip is for you!  To make a hair mask, combine a 1/4 cup of honey, 1/2 cup of plain yogurt, and a 1 tbsp of almond oil.  Blend the mixture and work it into your hair from the root to the tip.  Leave it on for 20 minutes and then rinse and shampoo.

4) Mayonnaise: To thicken your hair try a Mayo Mask!  Slather on approximately  a 1/2 cup of plain mayo over your hair from root to tip.  Let it sit for 30 minutes before shampooing.

5) Egg and EVOO:  Here is a tip to help prevent future split ends.  Make a hair mask by beating 1 egg yolk, 2 tbsps of olive oil, and 1 tsp of honey.  Massage in hair thoroughly.  Put on your trusty shower cap and let the mixture soak in for 30 minutes.  Rinse and shampoo.

6) Avocado: Have a spare sitting around after making guacamole?  Here is a great hair mask idea.  Mix mashed avocado with 1 tsp of olive oil and 1 tsp of honey.  Apply to your hair and leave for 20 minutes.  Rinse and shampoo.

7) Beer, Lemon Juice, or Vinegar:  Mix any ONE of these items with water (do not combine the three).  Apply AFTER shampooing as a rinse.  This will make your hair shine!

8) Papaya or Banana:  Both of these fruits are excellent for split ends!  Take the flesh of a fresh papaya (remove the skin and seeds) or a ripe banana.  Blend the fruit in a blender with 1/2 cup of yogurt, 1 egg yolk, 1 tsp of olive oil, and 1 tsp of honey.  Massage the mixture into hair and let it sit for 30 minutes.  Rinse and shampoo.

9) Epsom Salts:  Remove that greasy buildup with this great tip.  Mix 1 tbsp of salts with 1 cup of water.  Massage into hair.  Let sit and rinse well!

10) Coconut Oil:  Coconut oil is absorbed the best by your hair so try this tip.  Take a generous handful of coconut oil and work it through your hair root to tip.  Cover your hair with a shower cap and let the oil sit for 30 minutes.

*Use these recipes immediately after creating them so they won't spoil.

**Christmas is around the corner!  As a great gift for the hair lover in your family gather these ingredients into a gift basket and print or transcribe this list onto lovely paper to include with the present.


Thursday, November 14, 2013

Unconventional Cornucopia Corner

Our office challenge this week was to create a cornucopia out of unconventional materials.  Everyone took a stab at it!  Timothy attempted to construct his cornucopia out of cooked and braided spaghetti.  He failed.  Connie tried create a festive paste from glitter and craft glue.  She failed.  Wendell gave Lincoln Logs a try.  He failed.  Michael, who always answers "paper" when asked "paper or plastic?" destroyed several brown paper bags in his attempts.  While he came the closest of all the staff, he failed.  Finally Kathleen while pondering all the previous failures had a light bulb (compact florescent not incandescent of course, we're green) moment and drew a boxer cutter from her boot and cut the screen from the office outside door.  She then rolled it into a cone shape.  She secured the seams with staples (be careful).  Next, she trimmed the opening to make it even.  Kathleen then rolled the opening of the cornucopia to create a "cuff" to hide the rough ends and add structure to the opening.  Finally, she twisted the the narrow end into iconic upward horn shape of a cornucopia.   To help distract form any seams or overlap, she used striped jute strapping to create a rustic ribbon effect.  She finished her creation by rummaging through the office "Fall" Files for all sorts of appropriate fillings and fauna.  Needless to say the rest of the office staff was green with envy over Kathleen's creation and decided that it should be featured on the blog this week!  Below see pictures of her creation!

Wednesday, November 6, 2013

Thanksgiving Tablescape Extravaganza!

First, start off by collecting a supply of interesting fall bounty from Mother Nature like acorns, tiny pine cones, and dried leaves.  Add to this collection by picking up walnuts, gourds, corn husks, etc from your local grocery store. Next, spray paint everything metallic gold or if you have a specific color story whatever fits!  With these supplies you can make any of the following:
  • Napkin Rings: Glue acorns and leaves onto a small branch and affix a satin ribbon is a dot of hot glue.  You could also glue two acorns onto each end of a length of ribbon and tie into a casual bow.  You could affix star-anise (found in the spice aisle of your local grocery store) to lengths of ribbon as well.  These ideas are especially festive if your fold your napkin into a cornucopia/cone shape!
  • Place Cards: Tie a ribbon with a name "tag" onto a gilded gourd or mini pumpkin stem.  Take a fresh pomegranate (you don't have to gild this one) and pin a leaf shaped name tag to the fruit.  Take your gilded walnuts and wedge flag/pennant shaped card stock name tags into the seam between the shells.  Write the names in script for an extra fancy look. 
  • Trivia Turkey Place Cards:  Find a turkey pattern online.  Cut out the appropriate number for your expected guests from card stock.  Create a base by making a one inch cut into the bottom of the turkey cut outs and slip a corresponding cross piece into it.  This will create your traditional cross bar base.  Next create feathers by cutting colorful card stock with pinking shears and on each card write a Thanksgiving trivia question.  You can write the answers on the back side of each feather.   Affix card stock "feathers" to the turkey bodies with a brass paper fastener.  
Use any of your leftover gilding supplies to scatter around your table or group together on other surfaces such as your side board or entry table.

Try making these other festively fall table decor items!
  • Basket of Small White Gourds with Gold Stems: Wrap each stem in painters tape and spray paint the gourds white (or any color really).  Next remove the tape, and hand paint the stems metallic gold.  Arrange in a cornucopia, a rustic wooden bowl, or woven basket (turn it on it's side and "spill" the gourds out for a creative touch).
  • The Modern Approach to Painted Small Gourds/Pumpkins:  Wrap the stems of your gourds or mini pumpkins in painters tape and spray the surface in an array of matte colors.  You can go primary and bold or stick with modern takes on fall colors.  You can stack these colorful beauties in a glass cylinder.  You can also arrange them in a free standing tower.  First, collect 4-5 gourds or pumpkin  in progressively larger sizes.  Next, remove all the stems of the gourds except the smallest which will serve as the top of your tower.  Make sure the base gourd/pumpkin is flat bottomed to ensure your creation is steady.  Take a wooden skewer and press it through the center of the largest gourd, slide the next largest onto the skewer, and so on.  Finish with the smallest gourd/pumpkin with the stem intact on top.  You can make these in varied heights and cluster them in modern trios.
  • Sheaf of Wheat:  Gather approximately 100 stalks of dried wheat (This can be found at your local craft store).  Place a piece of floral wire down first onto your work table.  Next, place your bundle of wheat on top of the wire making sure the wire falls towards the top but below the grain pods.  Tap the top of the wheat pods gently to ensure they are even.  Next, secure the wire around the bundle.  Stand the bundle upright and begin to spread and turn the stems until you have a comfortably large base.  Tie a beautiful satin ribbon over the wire and let it drape along the stems. 
  • Gilded Turkeys:  Buy wooden or resin turkeys and spray paint with metallic gold paint.
  • Squash Gourd Candles: You can use things like acorn squash or other small round (like acorn) gourds.  Next, cut the top off of these gourds and then scoop out as much of the meat and seeds as possible.  You can use a melon-baller or sturdy spoon to achieve this.  Keep the inside smooth and follow the contours of the gourd because this will become your candle mold.  Next, melt old candles or wax with crayons for color and pour this into your gourd molds.  Sink a wick into the candles and drape excess wick over a knife or skewer placed across the opening of the gourd.  This will keep the wick centered.  Candle wicks can be purchased at your local craft store.    Let the wax harden completely (this may take several hours) and then break away the gourd mold.
 

Thursday, October 31, 2013

Solving The Too Much Candy Blues!

If you use Google, you will find dozens of sweet ideas to use up the excess booty from your little one's candy raid such as toppings on ice cream or cupcakes, chopped up into cookies, or swirled in cake batter! (Don't forget, candy freezes well and perfect for midnight snacks) We assembled a list of some not so typical uses for that left over candy.

  1. Save small candies such as Smarties or Life Savers to decorate holiday gingerbread houses.
  2. Save hard candies such as Jolly Ranchers or Worthers Originals to infuse vodka or rum. Use 1 liter of vodka and a 1/2 cup of hard candy.  Let it steep for a few weeks or until the candy dissolved.  We haven't tested this idea but you could also try melting the candy with a little water in a saucepan and pouring the mixture into the vodka. WARNING:  Melted sugar is extremely hot!
  3. Save Hershey's Kisses and Peanut Butter Cups to infuse in bourbon (or vodka as well).  Let 2 1/2 oz of chocolate steep for 24 hours in the booze.
  4. Donate extra candy to a non-profit to enhance holiday dinner.
  5. Put extra candy treats in a food basket for the needy
  6. Use for prizes at a bazaar or holiday sale.
  7. Use the candy in special treat bag for the baby sitter or retirement home.
  8. Emeril Lagasse's Chocolate Biscuit Puffs
    1. Ingredients: 1 package of refrigerated buttermilk biscuits, 1 milk chocolate candy bar or 4 mini almond joys cut in half, 2 tsps cinnamon and sugar.
    2. flatten each biscuit into a 3 inch circle.
    3. Break the candy bar into pieces
    4. Place the pieces into the center of the dough circles and bring up the edges pinching to seal.
    5. Place on un-greased cookie sheet and sprinkle with the cinnamon sugar mixture.
    6. Bake at 450 degrees for 8-10 minutes or until golden brown.

Wednesday, September 25, 2013

MEAL OF THE MONTH: SEPTEMBER

Roasted Cauliflower Soup With Bacon & Thyme

2 heads cauliflower
1/4 cup olive oil
1 quart chicken broth
1 pint half and half
2 tsp chopped fresh thyme
10 slices apple wood smoked bacon (or 3 slices country ham) minced & cooked
Pinh of white paper
kosher salt

Heat your oven to 400 degrees and line a rimmed baking sheet with parchment or foil lightly misted with cooking spray.

Cut out and discard the core of each head of cauliflower and then cut off the heads into large florets.

Drizzle florets with olive oil and toss to evenly coat.  Next, sprinkle with 2 tablespoons of salt and toss again.

Arrange florets in a single layer on the prepared baking sheet and roast for 30 minutes.  Flip the florets and roast for an additional 30 minutes until deeply caramelized and golden.

Transfer roasted florets to blender and add 2 cups of broth.  Puree and then add half and half.  Puree for an additional 3 minutes or until smooth.  At this point the puree will be very thick.  With the blender running, add the remaining both, thyme, and white pepper.  Taste and adjust seasonings accordingly.

The soup can be transferred to a saucepan and gently heated.  It can also be refrigerated and reheated easily.  The flavor is best when allowed to rest overnight.


Gluten-Free Nutella Cheesecake Pots
(This recipe is in grams so use a kitchen scale)
Makes 6-8 ramekins.

Crust:

150g gluten-free graham crackers
50-60g butter, melted

Cheesecake:

390g cream cheese, room temperature
50g light brown sugar
90g Nutella
40g chocolate chips

In a food processor, pulse the butter and graham cracker until they form crumbs.

Scoop spoonfuls of the crust mixture into small ramekins or mugs.  Press down lightly, but not as much as you would a normal cheesecake.

Clean food processor thoroughly.

Next, pulse together the cream cheese, sugar, and Nutella until smooth.  Take a taste and add additional Nutella if you wish.

Add chocolate chips and pulse until ground into fine bits.

Divide the cheese cake between the ramekins.  Cover and chill for six hours or until set.

Remove from fridge and let set on the counter for 20 minutes before serving.

(Thanks to The Gluten Free Scallywag for this epic recipe.)


It's that good!


Monday, September 16, 2013

Roll The Tape, Timmy!

Here are a few EXCITING new uses for tape!!!

1) Electrical tape comes in a variety of colors these days, so when your are having guests over use your collection to tag drink cups to avoid awkward mix ups!

2) When you tighten your belt does the tail hang low? If it does, try some double sided "fashion" tape to keep it in place.

3) Protect your plaster!  When hanging your next family photo or piece of artwork place a piece of scotch tape on the spot where the nail will be driven.  It will prevent cracking and chipping.

4) Did you eat your Triscuits over your keyboard and now it is full of crumbs and stuff?  Try sliding a long piece of transparent tape between the rows of keys.  The sticky side will pick up dust and food particles in a jiff!

5) Does your luggage look like everyone else's at the airport?  Help make baggage claim easier by adding a unique strip of colorful or patterned duct tape to your bags to help them stick out!

6) Next time you have spare screws left over from assembling your latest IKEA find, try storing them between layers of clear packing tape.  You can even label your packets to make finding them in the future easier!

Bonus Random Tip:  Connie was trying to pour the glitter from our glitter station back into its respective containers.  It took her a week to organize the particles into color groups and she didn't want to mess up her work.  The office was fresh out of funnels that day so Wendell (always willing to be Connie's mindless slave) quickly folded over and rolled a piece of aluminum foil from our foil station into a gleaming, silver funnel!  Connie was thrilled and the next three months of glitter sorting was avoided.  Thank you Wendell!  We know what a snit Connie gets in when she is assigned glitter sorting duties.