Total Pageviews

Tuesday, November 4, 2014

Enhance The Big Meal of The Month!

Thanksgiving can be so delicious but also a huge amount of work and effort to pull off.  We decided to curate a collection of quick and delicious side dish recipes to enhance your Thanksgiving feast without all the work!

Maple Orange Cranberry Sauce

2 bags (12 ounces each) fresh or frozen cranberries, thawed
1/2 cup sugar
1/2 cup maple syrup
1/2 cup orange juice
1 tbsp finely grated orange peel
1/4 tsp salt
1/4 tsp pepper

Simmer cranberries, sugar, maple syrup, orange juice, finely grated orange peel, salt, and pepper in medium saucepan on medium-high 10 to 15 minutes or until slightly thickened.
Courtesy of Good Housekeeping Magazine

Our Thought: Make ahead to allow the flavors to fully combine; plus it will be one less thing to make the day of!


Spinach-and-Cheese Puff

Butter, for baking dish
3x 10 ounce packages frozen chopped spinach, thawed and squeezed dry
1 1/2 cups half-and-half
3 large eggs, lightly beaten
1 1/2 cups coarsely grated Gruyere cheese (about 6 ounces)
Coarse salt and ground pepper
1/4 tsp ground nutmeg

1. Preheat oven to 350 degrees. Butter a shallow 1-quart baking dish.

2. In a large bowl, combine spinach, half-and-half, eggs, 1 cup Gruyere, 2 teaspoons salt, 1/8 teaspoon pepper, and nutmeg; stir to combine. Spread evenly in prepared baking dish, and top with remaining 1/2 cup Gruyere. Bake until set and top is golden brown, 30 to 35 minutes.

Courtesy of Martha Stewart

Our Thought: We chose this because it's a "dump and stir" recipe that uses a single bowl and it only takes minutes to prepare!

Butter-Pecan Sweet Potatoes

8 medium sweet potatoes (5 pounds)
2 tbsps olive oil
Coarse salt
2 tbsps butter, cut into small pieces
2 tbsps light-brown sugar
1/3 cup pecan pieces
1/8 tsp cayenne pepper

1. Preheat oven to 400 degrees. Peel potatoes and halve lengthwise; slice crosswise 1/2 inch thick. On a baking sheet, toss potatoes with olive oil; season with coarse salt.

2. Transfer half the potatoes to a second baking sheet; cook both sheets until potatoes are tender, tossing occasionally, 25 to 30 minutes.

3. Sprinkle with butter, brown sugar, pecan pieces, and cayenne pepper, dividing evenly. Bake until sugar is caramelized and hard, about 10 minutes. Gently toss; serve immediately.

Courtesy of Martha Stewart

Our Thought: Make this one ahead through Step 2! Save the room in the oven to finish it off before the meal starts!


Friday, September 19, 2014

Festive Fall Libations!

With the recent chill in the air, we all know that Autumn is just around the corner! We decided to curate a collection of comforting warm beverages!

Melted Ice Cream Hot Cocoa

2 sticks butter
1 cup white sugar
1 cup brown sugar
2 tsp almond extract
2 cups softened vanilla bean ice cream

1) Melt all the ingredients over gentle heat. Whisk until smooth. This becomes your drink base or concentrate.
2) Fill your favorite mug about halfway with the concentrate mix.
3) Add hot water gradually, tasting often until the drink reaches the desired sweetness.  You might have to experiment a few times to get the ratio to your liking.
4) Top with whipped cream and a dash of cinnamon or nutmeg.
*Concentrate can be refrigerated for up to 1 week.

.
Nutella Hot Chocolate

1 cup milk
2 tbsp Nutella spread
1 tbsp hazelnut liqueur (Optional)
whipped cream to top

1) Heat milk to simmering and remove from heat.
2) Add remaining ingredients.
3) Whisk until fully incorporated.
4) Top with whipped cream.

Coconut Milk Hot Chocolate

1 cup full fat coconut milk (the kind in a can)
2 cups almond milk
1/2 tsp vanilla extract
2 tbsp cocoa powder
4 oz fine chocolate of your choice
2-3 tbsp heavy cream (if you're lactose intolerant you can replace this with more coconut milk)

1) Mix milks, vanilla, cocoa powder and cream in a sauce pan.  Heat gently.
2) When the mixture is warm, add rough chopped chocolate.
3) Stir often until the mixture simmers
4) Turn the heat off and enjoy!

Coconut Chai Tea Latte (Care of The Cooking Channel)

1 tsp black peppercorn
8 cardamom pods
8 whole cloves
2 cinnamon sticks
2 inch piece fresh ginger, thinly sliced (optional)
6 black tea bags
1 cup whole or 2% milk
1 cup unsweetened regular or low-fat coconut milk
2 tbsp-1/4 cup light brown sugar, lightly packed

1) Lightly crush the spices and place in a medium saucepan. Add ginger if being used.
2) Add 6 cups of cold water to the saucepan and bring to a boil over high heat.
3) Remove from heat and add tea bags. Steep for 5 minutes.
4) Remove tea bags and let steep for 10 minutes.
5) Add milks and sugar into separate sauce pan and bring to a simmer.
6) Strain tea mixture into milk mixture using a fine mesh sieve. Heat through for 1 minute.
7) Whisk until the mixture is frothy. Pour and garnish with cinnamon sticks.

No-Coffee Pumpkin Latte

1 cup pumpkin puree
1 quart milk
1/4 white sugar
1 tbsp ground cinnamon
1 tbsp vanilla extract

1) Combine all ingredients in a large saucepan over medium heat. Using a whisk to blend well.
2) Heat to a simmer. Do not boil.
3) Serve and enjoy!

Hot Maple Apple Cider


6 cups apple cider
1/4 cup REAL maple syrup (preferably Vermont made)
2 cinnamon sticks
6 whole cloves
6 whole all spice berries
1 orange peel, cut into strips
1 lemon peel, cut into strips

1) Pour cider and maple syrup into a large saucepan.
2) Place spices and peels into the center of a square of cheesecloth. Fold up side and create a bundle, securing with kitchen string.
3) Drop spice bundle into the cider mixture.
4) Place saucepan over moderate heat until cider is hot but not boiling.
5) Remove from heat and discard spice bundle.
6) Ladle into mugs and add additional cinnamon stick if desired.


Sunday, August 3, 2014

Trend Alert: Chalk Paint!


Chalk paint isn't just for blackboards anymore! Chalk finish paint is becoming all the rage in home decor projects from furniture to decor items.  Celebrate's own Michael painted a uninspiring cabinet in his entryway using Americana Decor Chalky Finish paint (again, not chalk board paint) in the color "Treasure."  The process couldn't be more simple. First he just wiped down the cabinet with a damp rag. No additional sanding or stripping was needed. Then he removed the cabinet doors, drawer, and hardware.  He removed the hardware primarily to update it to a more modern look but it did also help prevent pain splattering on it.  Michael then painted the piece with two coats of the paint and finished it a coordinating creme wax.  The best part is the paint and wax are water-based making clean up a breeze!

BEFORE: 


AFTER:

Chalk paint can be used on a wide variety of surfaces such as glass!  Check out these painted and distressed  Ball jars in a spectrum of fun colors.


Sunday, July 13, 2014

Shedding Light on Lampshades!


Lets face it, lampshades are a necessity but they rarely get noticed!  You don't have to settle for how they look right off the shelf (i.e. plain Jane).  Why not have them be an enhancement than just a boring blank canvas next to the sofa!  Here is a list of a few ideas we have put together for you:


1) Bleach Pen: If you start with a colored lampshade, you can paint whimsical designs using an ordinary bleach pen found in the laundry isle of your favorite super market.  Work in small sections to avoid smudges. When the design turns white, rinse away the excess bleach.  Let it dry completely before use. 

2) Watercolors and Pin-pricking: If you start with a paper shade, you can use artist watercolors to paint simple and chic designs onto it.  Let your imagination guide you.  Once the artwork is dry, you can use a pin to perforate along the edge of some of the painted elements so the light can twinkle through.


3) Ombre: Start with a fabric shade. Mix a package of fabric dye according to directions.  Submerge the entire shade in container deep enough to accommodate it.  Set a timer for 10 minutes. Once your timer goes off, remove the shade and place it on an old towel or piece of wax paper.  Poor off 1/3 of the dye and return the shade to the color bath.  Set your timer again for 10 minutes.  Once again, when the timer goes off remove the shade and pour off another 1/3 of the dye.  Replace the shade and leave it in for a final 10 minutes. When finished, remove the shade and allow to completely dry before using it.  


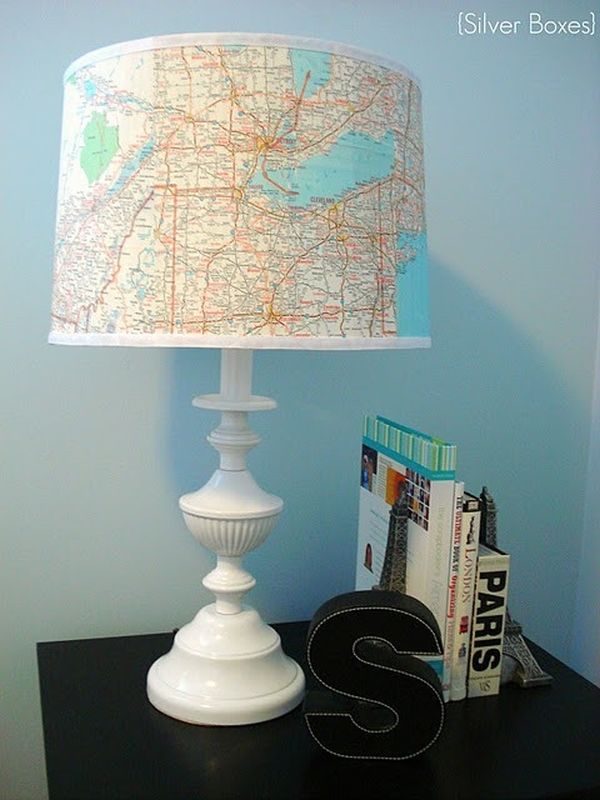
4) Spray Adhesive:  Using spray adhesive, you can add comic book pages, maps, pages from your favorite novels, pieces of fabric, etc. The sky's the limit! Be creative as you personalize your lamp.
                                               

5) Ribbons and Rosettes:  Using your trusty glue gun, you can embellish your lampshade with a row of sweet satin rosettes around the bottom.  You can buy them at your favorite craft store.  If you want a cleaner, more modern look try adding metallic strips or black patent leather trim to the top and bottom edges of the shade.

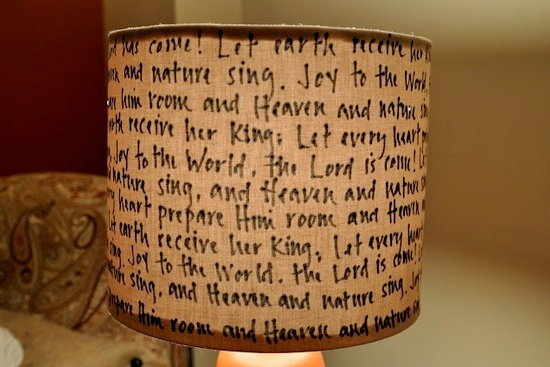
6) Paint Markers:  Use opaque paint markers to draw geometric pattern or lines. Use your lightest color first, let dry and then use a darker color for outlining.  You could also use these markers to write your favorite quotes, belief statements, poems, wishes, etc on the shade for a literary punch!


7) Buttons:  Use hot glue to adhere a variety of buttons or plastic, magnetic alphabet letters (the brightly colored ones kids play with on the fridge) to your shade for a fun pop of color!

8) Satin Ribbon for your boudoir:  Take wide satin ribbon in a color of your choice, anchor a piece inside using hot glue, and wrap your shape vertically.  If your shade is conical, be mindful to overlap the top layers of ribbon as you wrap.  Secure the end of the ribbon again using a dab of hot glue.


Wednesday, July 2, 2014

CELEBRATE: The 4th of July


Here are some great ideas to help make your Independence Day a little more festive from all of us at CELEBRATE!

Life is short, eat dessert first!

American Flag Cake
1 yellow cake mix of your choice
2 pints fresh blueberries
2 quarts fresh strawberries.
2 tubs of Cool Whip topping

1) Bake your cake mix following the manufacturers instructions for a 9x13 sized sheet cake.  Allow to cool completely and remove from pan.
2) Take a large bread knife and carefully cut the cake into two layers.
3) Place the bottom layer back into your 9x13 pan.  Cover in a generous layer of Cool Whip.  Slice 1/3 of your strawberries.  Top the Cool Whip layer with the sliced strawberries and a sprinkling of blueberries. 
4) Place the top layer of your cake over the filling and "frost" this with another generous layer of Cool Whip.
5) Cut the remaining strawberries in half.  Arrange the remaining blueberries in the upper left hand corner in a square.  Next, create red "stripes" using the strawberry halves.  You will want the end result to look like an American flag.
6) Serve and enjoy!

Can't afford that expensive bunting?  Find some inexpensive red, white, and blue fabric and drape, tying every 24 inches!

Make a festive garland!  Buy red, white, and blue construction paper.  Cut the paper into pennant shaped triangles.  Punch two holes in the wide end of each triangle and simple lace together onto cord or rope.

Liven up your table!  Add colorful crepe paper to the edge of your table using double sided tape. 

Create Fantastic Rockets! Fill a decorative bucket or planter with sand.  Next, cover paper towel or toilet paper tubes with red paper of your choice.  Cut a circle out of card stock and make a cut from the outside to the center.  When you overlap the cut edges this, it will create a cone which will become the top of your rocket.  Glue the top cone to the tube.  Glue red, yellow, and orange curling ribbon to the inside bottom of the tube.  These will be your flames!  Finish by gluing your "rocket" to a small dowel.  Stick dowels in the sand of your planter!  

Stars on your lawn!  Create a large star stencil approximately 9-12 inches in size out of cardboard or card stock.  Place your stencil on your freshly mowed lawn.  Using a spray bottle, heavily mist the grass within the stencil.  Next, sprinkle a generous amount of flour over the stencil and remove.  The flour will stick to the wet grass leaving festive white stars!

Place settings that go POW!  Create a fun place setting by placing boxes of sparklers onto white napkins and bundling them together with a festive red ribbon.

Jazz up ordinary bottles of water!  Remove the stick from miniature clothe or plastic flags.  Wrap over the bottle's label and secure.

Enjoy the day and drink responsibly! 

HAPPY 4TH OF JULY FROM ALL OF US AT CELEBRATE!!!

Wednesday, June 11, 2014

Meal of The Month: June

2-Ingredient Nutella Brownies


Ingredients
4 large eggs
1 cup Nutella (slightly less than a whole 13-ounce jar)
Optional: 1 cup chopped nuts
Equipment
8 x 8-inch baking dish
Parchment paper
Nonstick spray or oil
Measuring cups and spoons
Microwave-safe bowl or cup
Stand mixer or hand-mixer
Mixing bowl
Spatula

Instructions

  1. Heat the oven to 350°F with a rack placed in the middle position.
  2. Cut a length of parchment and lay it in your baking dish with the ends hanging over the sides of the dish like flaps. Spray the parchment and sides of the baking dish with cooking spary. (A light spray of cooking spay under the parchment will also help hold it secure.)
  3. Crack all 4 eggs into the bowl of your stand mixer or your mixing bowl. With the whisk attachment, whisk the eggs together. Begin on low speed and gradually increase to medium-high (7 on a Kitchenaid).
  4. Continue whisking the eggs until they become light lemon-colored and billowy, and are tripled in bulk. This will take 6 to 8 minutes (slightly longer if you're using a handheld mixer). The more billowy your eggs, the better the texture will be in your brownies and the less "eggy" they will taste.
  5. While the eggs are whisking, measure the Nutella and transfer it to a microwave-safe bowl. Heat the Nutella for 1 minute, stopping every 15 seconds to stir the Nutella. When warmed, the Nutella should be loose and creamy.
  6. With the mixer on low speed, drop spoonfuls of Nutella into the egg mixture using a spatula. (With a hand-mixer, add a little at a time and mix in between.) Continue mixing until all the Nutella has been added and the Nutella is thoroughly combined with the eggs.
  7.  Use a spatula to stir the mixture by hand a few times, making sure to scrape the sides and bottom of the bowl where the whisk might have missed.
  8. Pour the Nutella mixture into the prepared pan. Use a spatula to scrape the bowl clean.
  9. Transfer the dish to the oven and bake for 25 to 30 minutes. The brownies are done when they start to pull away from the sides of the dish and a cake tester inserted into the middle of the brownies comes away clean.
  10. Let the brownies cool as long as you can. They are delicious while still warm from the oven, but will easily fall apart. For sturdy brownies, wait until they are completely cooled before cutting or removing them from the pan.
  11. Store brownies in an airtight container at room temperature for up to a week or so.

Thanks to The Kitchn for this month's recipe!

Wednesday, May 28, 2014

Idiot Proof Art!


Art doesn't have to be complicated or complex!  Not every piece needs to be the next Monet or Botticelli.  Art should be about expression and should be fun.  We have several ideas that will help you create fun wall decor and will also help to inspire and ignite your inner artist.

1)  Simple images created on Microsoft Paint (which comes pre-installed on every computer) can be printed, cut out and pasted onto colorfully paint canvases. The examples below were created for a bathroom and were super easy to create.  We suggest using latex, acrylic, or spray paints to color your canvas.  These paints are easy to use, dry quickly, and have great coverage. Be sure to apply a coat of clear acrylic sealer such as Modge Podge over the top to seal the work.

2) Circles Two Ways.  Don't hesitate to play around with geometric shapes. Take your canvas, draw a line from one corner to another, dividing the canvas into two triangles.  For the picture below, one triangle was painted grey and the other was painted black.  Once this is dry, use a circle template or various size cups to trace concentrically smaller circles from one corner to the next.  Paint the circles yellow and voila!  To achieve this look, you could also start by painting the whole canvas yellow.  Next, cut out various sized circles from contact paper.  Apply the circle "stickers" to the canvas, press the edges tightly. Finally, paint each triangle, black and grey using a small foam roller.  If you are spray painting, be sure to cover the first painted side before spraying the next to avoid paint misting. 


3) Stencils! Don't be afraid to use them.  You can find a wide selection in your local craft store, at yard sales, etc.  
4) Tape Art!  Its super easy.  Cover your canvas randomly with tape, again press the edges firmly to avoid bleeding.  Paint over the canvas as you see fit.  In the painting below, the tape was applied to an unpainted canvas to create white lines.  You could paint your canvas first, then tape, then paint again to create colored lines.  If the edges aren't crisp, just use a ruler and a permanent fine tip marker to clean up the edges.
5) Bubble Art!  Its just like blowing bubbles in your milk as a kid and just as fun.  Mix 2 tbsp of tempera paint, 2 tbsp of liquid dish soap, and 1/2 cup of water in a shallow ball.  Using a straw, blow bubbles into the mixture until they reach over the top.  Next, lay the paper or canvas over the top of the bowl to pick up color from the bubbles as they pop.  
Thanks Better Homes and Gardens for this image!
6) Get sticky!  Paint your canvas a color of your choice.  Next, apply stripes of patterned washi tape, large circle stickers, etc onto your canvas.  You can then seal your masterpiece with a clear coat!