Total Pageviews

Showing posts with label Jesus. Show all posts

Friday, September 19, 2014

Festive Fall Libations!

With the recent chill in the air, we all know that Autumn is just around the corner! We decided to curate a collection of comforting warm beverages!

Melted Ice Cream Hot Cocoa

2 sticks butter
1 cup white sugar
1 cup brown sugar
2 tsp almond extract
2 cups softened vanilla bean ice cream

1) Melt all the ingredients over gentle heat. Whisk until smooth. This becomes your drink base or concentrate.
2) Fill your favorite mug about halfway with the concentrate mix.
3) Add hot water gradually, tasting often until the drink reaches the desired sweetness.  You might have to experiment a few times to get the ratio to your liking.
4) Top with whipped cream and a dash of cinnamon or nutmeg.
*Concentrate can be refrigerated for up to 1 week.

.
Nutella Hot Chocolate

1 cup milk
2 tbsp Nutella spread
1 tbsp hazelnut liqueur (Optional)
whipped cream to top

1) Heat milk to simmering and remove from heat.
2) Add remaining ingredients.
3) Whisk until fully incorporated.
4) Top with whipped cream.

Coconut Milk Hot Chocolate

1 cup full fat coconut milk (the kind in a can)
2 cups almond milk
1/2 tsp vanilla extract
2 tbsp cocoa powder
4 oz fine chocolate of your choice
2-3 tbsp heavy cream (if you're lactose intolerant you can replace this with more coconut milk)

1) Mix milks, vanilla, cocoa powder and cream in a sauce pan.  Heat gently.
2) When the mixture is warm, add rough chopped chocolate.
3) Stir often until the mixture simmers
4) Turn the heat off and enjoy!

Coconut Chai Tea Latte (Care of The Cooking Channel)

1 tsp black peppercorn
8 cardamom pods
8 whole cloves
2 cinnamon sticks
2 inch piece fresh ginger, thinly sliced (optional)
6 black tea bags
1 cup whole or 2% milk
1 cup unsweetened regular or low-fat coconut milk
2 tbsp-1/4 cup light brown sugar, lightly packed

1) Lightly crush the spices and place in a medium saucepan. Add ginger if being used.
2) Add 6 cups of cold water to the saucepan and bring to a boil over high heat.
3) Remove from heat and add tea bags. Steep for 5 minutes.
4) Remove tea bags and let steep for 10 minutes.
5) Add milks and sugar into separate sauce pan and bring to a simmer.
6) Strain tea mixture into milk mixture using a fine mesh sieve. Heat through for 1 minute.
7) Whisk until the mixture is frothy. Pour and garnish with cinnamon sticks.

No-Coffee Pumpkin Latte

1 cup pumpkin puree
1 quart milk
1/4 white sugar
1 tbsp ground cinnamon
1 tbsp vanilla extract

1) Combine all ingredients in a large saucepan over medium heat. Using a whisk to blend well.
2) Heat to a simmer. Do not boil.
3) Serve and enjoy!

Hot Maple Apple Cider


6 cups apple cider
1/4 cup REAL maple syrup (preferably Vermont made)
2 cinnamon sticks
6 whole cloves
6 whole all spice berries
1 orange peel, cut into strips
1 lemon peel, cut into strips

1) Pour cider and maple syrup into a large saucepan.
2) Place spices and peels into the center of a square of cheesecloth. Fold up side and create a bundle, securing with kitchen string.
3) Drop spice bundle into the cider mixture.
4) Place saucepan over moderate heat until cider is hot but not boiling.
5) Remove from heat and discard spice bundle.
6) Ladle into mugs and add additional cinnamon stick if desired.


Sunday, April 20, 2014

Eye Sore No More!

Here are a few ideas to camouflage those ugly, household necessities!

1) The fuse box in your apartment or condo is very important, but not very attractive!  Create a hinged door using a chalkboard, painting, or large framed photo.
2) Your thermostat is essential to daily life but it typically isn't a style object.  Try covering up with a press-board "cigar" box. Cut a hole in the box's lid large enough for the thermostat.  Next screw the lid to the wall around the unit allowing the box to act as a cover that can be flipped up!  You can decorate the outside of the box as you would like to match your decor!  You can also cover your thermostat with a deep stretched canvas.  Using a level, measure and place two nails on either side of  the wall next to the unit.  You could even use push-pins if you're a renter.  Next hang the appropriate sized, decorated deep canvas over the thermostat.

3) We all have speakers these days with surround sound systems for our TVs and other speaker systems for other audio systems.  These speakers are getting more eye pleasing but they often times still do not blend into your decor.  For small wall mounted speakers, you can create a deep box from pine framing.  You can then stretch any light weight fabric over the frame like an artist canvas and staple it into place.  The sound will pass through the fabric easily.  If you have larger, floor speakers from older stereo systems you can also spruce these up.  Create a box from 1/4 inch plywood and add a piece of lattice to the front of the box.  Of course the back of the box would be left open to allow you to slide the cover over the speakers.  Paint the cover to match your home.


4) The wireless router is fundamental in today's home but like speakers they are not always attractive.  You can hide your router in a wooden or press-board "faux" box.  You see these storage boxes disguised as books a lot at home decor stores.  Simply make sure to drill or cut holes for heat ventilation and for cords to pass through.  If you are ambitious, you can hollow out a large book you might find at early spring yard sales.

5) Finally, we can all agree that we can not live a civilized life without toilet paper but it just isn't visually attractive when sitting on the back of your toilet!  Try wrapping spare rolls of toilet paper in decorative tissue.  The tissue can be customized to your decor and can even be switched out during holidays!

Sunday, February 23, 2014

We're Going to The Dogs!


At the CELEBRATE home office, we have a large black Labrador retriever named Panini (don't ask). As we got used to Panini's demands and quirks, we realized we could make our lives and the lives of thousands of pet owners lives easier if we wrote down some of the interesting tips and tricks we have used, created, thought of over time!  Here are a sampling of them!

TIPS FOR BETTER CO-SPECIES COHABITATION:


  1. Pet's absorb through their paws whatever you wash your floors with.  To save puppy pain, rinse your floors using a mixture of vinegar and water.
  2. Beware the following foods and plants are hazardous to your pooch: chocolate, garlic, chicken bones, sugar free gum with xylital, aloe, ivy, and amaryllis.
  3. Keep your dry dog food in an airtight container.  It keeps out bugs, prevents spills, and stops pup from raiding the pantry.
  4. Panini has a crate but she used to whine watching the busy goings on in the DIY Lab so we draped a light blocking blanket over the crate to create a comfy cave.  Now at nap time, she is happy a grilled sandwich! 
  5. Give your dog it's own plump bed, not yours!  You can make it yourself.  Sew or use iron-on bond tape to create a rectangular pocket the appropriate size of your dog and fill with a mix of fiber-fill and cedar chips.  The cedar chips repel fleas!  Make it soft and plump and your dog will think he's on cloud nine.  Here is another thought for small dogs.  Just use an old pillow of yours you were going to throw away.  Your dog will love how it smells like you.  You can even open the seam a bit to add those handy cedar chips.  In that case, a pillow case would be an easy to wash cover.
  6. When we first gave Panini a bath, we clogged the labs test tub with her fur.  Our solution, we took a small piece of window screening, placed it over the drain, and held it down with a couple pieces of masking/duct tape.  The screening catches the loose fir and makes it easy to remove.  You could also glue heavy washers or small stones to each corner of your screen to weight it down so that you wouldn't need to use the tape.
EASY DIY TOYS:
Dogs like Panini that like to chew things should have their toys rotated frequently to avoid boredom which can lead to chewing of furniture or important experiments that may being going on it the lab.  Oh yea, we learned the hard the way!

Socks: 
  • Take an old sock and add a handful of dog treats to it.  Roll it up, similar to how you would when doing your laundry.  Put the rolled sock inside another.  It will take the dog a while to get through to the treats. 
  • Take a soda bottle (remove the cap), slide it inside a sock and tie the end.  The dog will love the crinkly sound the empty bottle.
Tennis Balls:

  • Take three strips of old t-shirt or fleece (which is incredibly strong) and braid them together into a rope of sorts.  Next, take a tennis ball and cut a hole just large enough to push the braid through tightly.  Knot the braid on  both ends.  You can toss this around like a fox tail toy.
  • Place several tennis balls in a deep muffin tin.  Your pup will spend hours trying to figure out how to free the balls from their enclosures.
Paper Towel Tube/PVC Pipe:

  • Put snacks inside a paper towel tube.  Press the ends of the tube flat.  Cover the whole thing with duct tape and give it a toss!  The dog will love trying to get at the snacks.
  • Take a PVC pipe, place dried beans inside and cap both ends.  It makes a great rattle!
Plastic:

  • A plastic milk jug that is rinsed and has the cap removed makes the cheapest and quickest dog toy.
  • A large plastic jar from your local wholesale super store that would normally have held nuts or candy makes an excellent toy!  Remove the lid and give it a toss.  Your pup will take time to realize she can only grab it from the open end and will have fun chasing it around as you toss it and bounce it all over! 
Ice/food:
  • Try making "doggie pops"!  Freeze beef or chick broth in plastic containers. You can even suspend treats or meat scrapes in the broth for added treat value.  We recommend using low or no sodium broth if you are buying from the supermarket.  Make them in the size that is appropriate for your breed.  They will LOVE them as a treat on a hot day!
  •  Take slices of sweet potato about 1-1.5 inches thick, using a hand held corer put a hole in the center of each slice, and then bake the slices on a lined cookie sheet at 200 degrees for several hours or until the slices have dried and are leathery.  Next, thread the dried potato "rings" onto a length of thick nylon rope.   Knot both end and give it a toss.  Your pooch will love gnawing on this treat. 
 Please note, be responsible and monitor your dog at all times while he or she plays especially with these toys!

Sunday, February 2, 2014

Romantic Dinner 101: Valentine's Day


  1. Location, location, location! Anyone can make a reservation at the local French restaurant, but we are going to help you create the perfect ambiance in your own home. Find a non-traditional and unexpected spot to enjoy dinner within your house or apartment.  If you are lucky enough to live in a warm climate, utilize your outdoor space as well. For example, the formal dining room, an intimate nook in the bedroom, the garden, etc.
  2. Use your nicest dishes, flatware, and glassware.  This helps set the "special" feeling of the evening!
  3. Mood music is key.  Put on a classic artist such as Eric Clapton or Sinatra.  Play a record for a special feeling.
  4. Avoid scented candles around your dining area.  Stick with unscented, white candles for a classic look. Make sure however the house does smell pleasant and the temperature is comfortable.  Take out the trash, change the litter box, etc.
  5. For romantic lighting, cluster your pillar candles for the perfect glow. Be sure they are no higher than 12 inches tall.  Scatter votive candles around the room to add ambiance and mood.
  6. Keep your menu fairly simple and prepare as much in advance to save your attention for your special guest.  This also keeps the kitchen relatively neat.  No one wants to spend the evening stuck doing dishes or looking at the mountains of dishes made from the meal.
  7. Make the meal three courses: appetizer, entree and dessert. This makes it feel more special than just a snack.
  8. Make sure you have a pitcher or glasses of ice water flavored with citrus fruits, cucumber, or even basil/mint in addition to wine or cocktails.
  9. Avoid messy and overly rich foods for the meal.  No one feels sexy when they are bloated or if they have greasy fingers from tacos.
  10.  Make sure your timing on the food is just right so everything is served at the correct temperature and time.  Be ready when your guest arrives.
  11. Before your guest arrives, go and dress up in a special outfit.  A nice dress or shirt and tie.  Remember this is a special evening, no PJs or baseball caps.
  12. Make sure to eliminate all distractions including technology, phones, pets, etc.  Send your cats or dogs for an overnight at the kennel or grandma's house.
  13. After your dinner is finished, dance together, watch a romantic movie, or maybe hand dip strawberries together.
  14. Our last tip, our favorite way to start and end a romantic, Valentine's dinner: Chocolate.
      • Chocolate Martini: Take a martini glass and drizzle hard shell ice cream coating on the inside of the glass.  Use both milk and white chocolate varieties to create a pattern. Next, in a shaker combine 3/4 cup half and half or light cream, 1 cup dark chocolate liquor, 1/4 cup vodka, with ice.  Shake to combine.  Strain into prepared glass.  Garnish with a conversation heart.
      • Flourless Fudge Cookies (Courtesy of King Arthur Flour): 
          • 2 1/4 cups confectioners sugar
          • 1/4 tsp salt
          • 1 tsp espresso powder (optional but divine)
          • 1 cup dutch process (preferred) cocoa powder
          • 3 large egg whites
          • 2 tsp gluten free vanilla extra (most pure vanilla extracts should be gluten free)
        • Pre-heat oven to 350 degrees.  Lightly grease two cookie sheet, or line them with greased parchment paper. Stir together all ingredients until smooth.  Scrap the sides and bottom of the bowl and stir again until smooth.  Drop the soft, batter like dough onto the prepared baking sheets in 1 1/2 inch circles.  Bake the the cookies for 8 minutes.  They should spread, become slightly shiny, and develop faintly crackly tops.  Remove from oven and allow to cool on the cookie sheets.  The result is an ultra chewy, rich chocolate cookie with no additional fat or gluten!


Sunday, January 5, 2014

Unconventional Wine Racks

Before you start this project, take a look around your home and decide what style of wine rack will accent your decor the best!  Often the first idea many of us think about when considering building an unconventional wine rack is to somehow gather a bunch of PVC piping together in some fashion using glue or screws.  This idea is wonderful but instead of just joining four tubes together in a square shape, give stab at something more artistic!  See the picture below!  The following ideas we have assembled take a more unexpected course!

1) If you would like to go for the PVC pipe look but want to try other materials, give these a try: black sub-pump lining, shiny aluminum duct, or coffee can with both ends removed.  You can gather these tubes together using airplane cable, large belt, rope, etc.

2) You could create a more organic wine holder by assembling terracotta chimney liners, bricks, or cinder blocks into a unique order!

3) Create a sling or hammock!  Use fabric such as canvas or duck cloth to create pockets in which bottles can be nestled.  You could also do this with belts!

4) Use wood! Find the space you would like to hang a wine rack in and determine whether you will need a 8-12 inch width board (the length of the board will be determined by your space).  Next, purchase several large hose clamps and gather several large coffee cans or soup cans (with both ends removed).  Draw parallel lines in several places along the length of board (approximately 6-8 inches apart). Screw the hose clamps (two at a time) to the board at each end of the parallel lines.  Secure the clamps around the cans and voila!  A vertical wine holder!   You can also drill smaller holes into a plank and stick the necks of the bottles in these smaller holes.

5) Try Tinker Toys or Legos for a fun, whimsical look!

6) A leather or canvas firewood carrier hung from the ceiling with chain or a sturdy pipe or rod could be slid through the handles.

7 ) A sturdy, in and out style mailbox/paper organizer.  Be sure the one you select can bear the weight of several wine bottles.  Check junk stores or antique shops for sturdy metal or wood ones.

8) A spare drawer will work!  Have an extra drawer in your kitchen or buffet (or ANYWHERE)?  Line it with foam and slip some wine bottles in it.

9) A wooden crate, antique or from the local craft store!  Paint, decorate, and divide!

10) Try an antique metal pail! Stencil, design, and voila!

Check out some pictures  of other great ideas below!


Thursday, December 5, 2013

Meal Of The Month: Turkey Left Over Ideas from Funky to Fancy


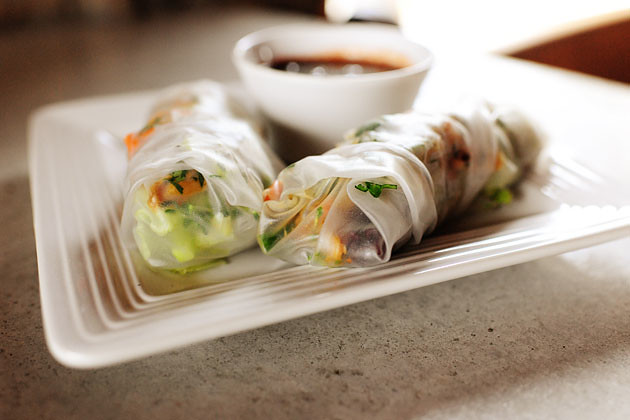
FUNKY: Turkey Spring Rolls
(Thank You Ree Drummond from the Food Network for the recipe)

Ingredients:
2 cups shredded leftover Thanksgiving turkey
3 tablespoons soy sauce
1 teaspoon sesame oil
1 teaspoon rice vinegar
1/2 teaspoon hot chile oil
1 package cellophane noodles
Eight 8 1/2-inch rice paper wrappers
3 leaves green-leaf lettuce, torn into pieces
1/2 cup alfalfa sprouts
1 carrot, cut into julienne
1 cucumber, cut into julienne
3 tablespoons finely chopped fresh cilantro

Dipping Sauce:
1 cup leftover cranberry sauce
2 tablespoons soy sauce
Hot chile oil

Directions
Place the turkey in a bowl and drizzle in the soy sauce, sesame oil, rice vinegar and the hot chili oil. Stir to combine and give it a taste. If you'd like a stronger flavor, add a little more of any of the ingredients.

Next, place the cellophane noodles in a large bowl. Cover them with boiling water and let them sit according to the package directions.

When they are tender but still have a nice bite, drain and set the noodles aside.

Soften the rice paper wrappers by placing them one by one into a bowl of warm water and taking them out when they're soft but still hold together.

To assemble each spring roll, lay a wrapper on a plate. Lay a small line of noodles in the center. Add a small amount of lettuce, turkey, alfalfa sprouts, a few carrot and cucumber strips, and top with a sprinkling of cilantro.

Fold in the sides of the wrappers and roll it into a tight roll. Repeat to make the rest of the rolls.

For the dipping sauce: Combine the cranberry sauce, soy sauce and a few dashed chile oil.

Dip the rolls into the sauce and dig in! Best if eaten within 1 hour of preparing.

Ree Drummond

FANCY: Leftover Turkey Pate

Ingredients:


  • 14oz cold cooked turkey
  • 1 large onion, chopped
  • 3oz butter
  • 4 tablespoons single cream (or light cream)
  • 2 tablespoons dry sherry
  • chopped parsley
  • salt and black pepper
  • lemon (as a garnish)
  • Directions

    1. Melt the butter in a saucepan, add the onion and fry until transparent.
    2. Remove pan from the heat and add the turkey meat.
    3. Place the mixture in a food processor and finely chop.
    4. Add the cream and sherry and beat until it is a smooth consistency.
    5. Place the mixture into a serving dish or individual ramekins and chill in the fridge for at least 3 hours.
    6. To serve, sprinkle with chopped parsley and place a lemon slice twist on top.

  • Celebrate Food Tip:
  • For this recipe, you can place some of your leftover, cooked turkey in the freezer to have on hand in case you have unexpected holiday company or if you have to bring something to a soiree!


Tuesday, November 26, 2013

Everyday Hair Gourmet!

Turn your bathroom into a salon with a trip to pantry (or fridge)!  Try this wonderful list of at-home hair treatments we have compiled for you.

1) Carrots:  Who would have thunk it?! If you have scarlet locks, you can revitalize and deepen your color with this produce staple!  Cut 2 large carrots into big chunks and boil in 2 cups water.  Turn down the heat and simmer until the water has a lovely orange glow.  Cool the water and remove the carrot chunks (We dying to know what would happen if you pureed it and used it as a hair mask including the carrot chunks!).  Pour the carrot water over dry hair.  Put on your favorite shower cap and wait 20 minutes.  Rinse and then use a mild shampoo and conditioner.  You'll look as radiant as your Christmas Tree!

2) Milk:  Add 1 tsp honey to 2 cups of warm milk.  If you have coarse hair use whole milk and if you have fine hair use skim milk!  Mix the ingredients until the honey dissolves and pour over dry hair.  After 15 minutes rinse with warm water and shampoo and condition as usual.

3) Almond Oil:  Frizzy hair?  This tip is for you!  To make a hair mask, combine a 1/4 cup of honey, 1/2 cup of plain yogurt, and a 1 tbsp of almond oil.  Blend the mixture and work it into your hair from the root to the tip.  Leave it on for 20 minutes and then rinse and shampoo.

4) Mayonnaise: To thicken your hair try a Mayo Mask!  Slather on approximately  a 1/2 cup of plain mayo over your hair from root to tip.  Let it sit for 30 minutes before shampooing.

5) Egg and EVOO:  Here is a tip to help prevent future split ends.  Make a hair mask by beating 1 egg yolk, 2 tbsps of olive oil, and 1 tsp of honey.  Massage in hair thoroughly.  Put on your trusty shower cap and let the mixture soak in for 30 minutes.  Rinse and shampoo.

6) Avocado: Have a spare sitting around after making guacamole?  Here is a great hair mask idea.  Mix mashed avocado with 1 tsp of olive oil and 1 tsp of honey.  Apply to your hair and leave for 20 minutes.  Rinse and shampoo.

7) Beer, Lemon Juice, or Vinegar:  Mix any ONE of these items with water (do not combine the three).  Apply AFTER shampooing as a rinse.  This will make your hair shine!

8) Papaya or Banana:  Both of these fruits are excellent for split ends!  Take the flesh of a fresh papaya (remove the skin and seeds) or a ripe banana.  Blend the fruit in a blender with 1/2 cup of yogurt, 1 egg yolk, 1 tsp of olive oil, and 1 tsp of honey.  Massage the mixture into hair and let it sit for 30 minutes.  Rinse and shampoo.

9) Epsom Salts:  Remove that greasy buildup with this great tip.  Mix 1 tbsp of salts with 1 cup of water.  Massage into hair.  Let sit and rinse well!

10) Coconut Oil:  Coconut oil is absorbed the best by your hair so try this tip.  Take a generous handful of coconut oil and work it through your hair root to tip.  Cover your hair with a shower cap and let the oil sit for 30 minutes.

*Use these recipes immediately after creating them so they won't spoil.

**Christmas is around the corner!  As a great gift for the hair lover in your family gather these ingredients into a gift basket and print or transcribe this list onto lovely paper to include with the present.


Thursday, November 14, 2013

Unconventional Cornucopia Corner

Our office challenge this week was to create a cornucopia out of unconventional materials.  Everyone took a stab at it!  Timothy attempted to construct his cornucopia out of cooked and braided spaghetti.  He failed.  Connie tried create a festive paste from glitter and craft glue.  She failed.  Wendell gave Lincoln Logs a try.  He failed.  Michael, who always answers "paper" when asked "paper or plastic?" destroyed several brown paper bags in his attempts.  While he came the closest of all the staff, he failed.  Finally Kathleen while pondering all the previous failures had a light bulb (compact florescent not incandescent of course, we're green) moment and drew a boxer cutter from her boot and cut the screen from the office outside door.  She then rolled it into a cone shape.  She secured the seams with staples (be careful).  Next, she trimmed the opening to make it even.  Kathleen then rolled the opening of the cornucopia to create a "cuff" to hide the rough ends and add structure to the opening.  Finally, she twisted the the narrow end into iconic upward horn shape of a cornucopia.   To help distract form any seams or overlap, she used striped jute strapping to create a rustic ribbon effect.  She finished her creation by rummaging through the office "Fall" Files for all sorts of appropriate fillings and fauna.  Needless to say the rest of the office staff was green with envy over Kathleen's creation and decided that it should be featured on the blog this week!  Below see pictures of her creation!

Wednesday, November 6, 2013

Thanksgiving Tablescape Extravaganza!

First, start off by collecting a supply of interesting fall bounty from Mother Nature like acorns, tiny pine cones, and dried leaves.  Add to this collection by picking up walnuts, gourds, corn husks, etc from your local grocery store. Next, spray paint everything metallic gold or if you have a specific color story whatever fits!  With these supplies you can make any of the following:
  • Napkin Rings: Glue acorns and leaves onto a small branch and affix a satin ribbon is a dot of hot glue.  You could also glue two acorns onto each end of a length of ribbon and tie into a casual bow.  You could affix star-anise (found in the spice aisle of your local grocery store) to lengths of ribbon as well.  These ideas are especially festive if your fold your napkin into a cornucopia/cone shape!
  • Place Cards: Tie a ribbon with a name "tag" onto a gilded gourd or mini pumpkin stem.  Take a fresh pomegranate (you don't have to gild this one) and pin a leaf shaped name tag to the fruit.  Take your gilded walnuts and wedge flag/pennant shaped card stock name tags into the seam between the shells.  Write the names in script for an extra fancy look. 
  • Trivia Turkey Place Cards:  Find a turkey pattern online.  Cut out the appropriate number for your expected guests from card stock.  Create a base by making a one inch cut into the bottom of the turkey cut outs and slip a corresponding cross piece into it.  This will create your traditional cross bar base.  Next create feathers by cutting colorful card stock with pinking shears and on each card write a Thanksgiving trivia question.  You can write the answers on the back side of each feather.   Affix card stock "feathers" to the turkey bodies with a brass paper fastener.  
Use any of your leftover gilding supplies to scatter around your table or group together on other surfaces such as your side board or entry table.

Try making these other festively fall table decor items!
  • Basket of Small White Gourds with Gold Stems: Wrap each stem in painters tape and spray paint the gourds white (or any color really).  Next remove the tape, and hand paint the stems metallic gold.  Arrange in a cornucopia, a rustic wooden bowl, or woven basket (turn it on it's side and "spill" the gourds out for a creative touch).
  • The Modern Approach to Painted Small Gourds/Pumpkins:  Wrap the stems of your gourds or mini pumpkins in painters tape and spray the surface in an array of matte colors.  You can go primary and bold or stick with modern takes on fall colors.  You can stack these colorful beauties in a glass cylinder.  You can also arrange them in a free standing tower.  First, collect 4-5 gourds or pumpkin  in progressively larger sizes.  Next, remove all the stems of the gourds except the smallest which will serve as the top of your tower.  Make sure the base gourd/pumpkin is flat bottomed to ensure your creation is steady.  Take a wooden skewer and press it through the center of the largest gourd, slide the next largest onto the skewer, and so on.  Finish with the smallest gourd/pumpkin with the stem intact on top.  You can make these in varied heights and cluster them in modern trios.
  • Sheaf of Wheat:  Gather approximately 100 stalks of dried wheat (This can be found at your local craft store).  Place a piece of floral wire down first onto your work table.  Next, place your bundle of wheat on top of the wire making sure the wire falls towards the top but below the grain pods.  Tap the top of the wheat pods gently to ensure they are even.  Next, secure the wire around the bundle.  Stand the bundle upright and begin to spread and turn the stems until you have a comfortably large base.  Tie a beautiful satin ribbon over the wire and let it drape along the stems. 
  • Gilded Turkeys:  Buy wooden or resin turkeys and spray paint with metallic gold paint.
  • Squash Gourd Candles: You can use things like acorn squash or other small round (like acorn) gourds.  Next, cut the top off of these gourds and then scoop out as much of the meat and seeds as possible.  You can use a melon-baller or sturdy spoon to achieve this.  Keep the inside smooth and follow the contours of the gourd because this will become your candle mold.  Next, melt old candles or wax with crayons for color and pour this into your gourd molds.  Sink a wick into the candles and drape excess wick over a knife or skewer placed across the opening of the gourd.  This will keep the wick centered.  Candle wicks can be purchased at your local craft store.    Let the wax harden completely (this may take several hours) and then break away the gourd mold.
 

Thursday, October 31, 2013

Solving The Too Much Candy Blues!

If you use Google, you will find dozens of sweet ideas to use up the excess booty from your little one's candy raid such as toppings on ice cream or cupcakes, chopped up into cookies, or swirled in cake batter! (Don't forget, candy freezes well and perfect for midnight snacks) We assembled a list of some not so typical uses for that left over candy.

  1. Save small candies such as Smarties or Life Savers to decorate holiday gingerbread houses.
  2. Save hard candies such as Jolly Ranchers or Worthers Originals to infuse vodka or rum. Use 1 liter of vodka and a 1/2 cup of hard candy.  Let it steep for a few weeks or until the candy dissolved.  We haven't tested this idea but you could also try melting the candy with a little water in a saucepan and pouring the mixture into the vodka. WARNING:  Melted sugar is extremely hot!
  3. Save Hershey's Kisses and Peanut Butter Cups to infuse in bourbon (or vodka as well).  Let 2 1/2 oz of chocolate steep for 24 hours in the booze.
  4. Donate extra candy to a non-profit to enhance holiday dinner.
  5. Put extra candy treats in a food basket for the needy
  6. Use for prizes at a bazaar or holiday sale.
  7. Use the candy in special treat bag for the baby sitter or retirement home.
  8. Emeril Lagasse's Chocolate Biscuit Puffs
    1. Ingredients: 1 package of refrigerated buttermilk biscuits, 1 milk chocolate candy bar or 4 mini almond joys cut in half, 2 tsps cinnamon and sugar.
    2. flatten each biscuit into a 3 inch circle.
    3. Break the candy bar into pieces
    4. Place the pieces into the center of the dough circles and bring up the edges pinching to seal.
    5. Place on un-greased cookie sheet and sprinkle with the cinnamon sugar mixture.
    6. Bake at 450 degrees for 8-10 minutes or until golden brown.

Wednesday, September 25, 2013

MEAL OF THE MONTH: SEPTEMBER

Roasted Cauliflower Soup With Bacon & Thyme

2 heads cauliflower
1/4 cup olive oil
1 quart chicken broth
1 pint half and half
2 tsp chopped fresh thyme
10 slices apple wood smoked bacon (or 3 slices country ham) minced & cooked
Pinh of white paper
kosher salt

Heat your oven to 400 degrees and line a rimmed baking sheet with parchment or foil lightly misted with cooking spray.

Cut out and discard the core of each head of cauliflower and then cut off the heads into large florets.

Drizzle florets with olive oil and toss to evenly coat.  Next, sprinkle with 2 tablespoons of salt and toss again.

Arrange florets in a single layer on the prepared baking sheet and roast for 30 minutes.  Flip the florets and roast for an additional 30 minutes until deeply caramelized and golden.

Transfer roasted florets to blender and add 2 cups of broth.  Puree and then add half and half.  Puree for an additional 3 minutes or until smooth.  At this point the puree will be very thick.  With the blender running, add the remaining both, thyme, and white pepper.  Taste and adjust seasonings accordingly.

The soup can be transferred to a saucepan and gently heated.  It can also be refrigerated and reheated easily.  The flavor is best when allowed to rest overnight.


Gluten-Free Nutella Cheesecake Pots
(This recipe is in grams so use a kitchen scale)
Makes 6-8 ramekins.

Crust:

150g gluten-free graham crackers
50-60g butter, melted

Cheesecake:

390g cream cheese, room temperature
50g light brown sugar
90g Nutella
40g chocolate chips

In a food processor, pulse the butter and graham cracker until they form crumbs.

Scoop spoonfuls of the crust mixture into small ramekins or mugs.  Press down lightly, but not as much as you would a normal cheesecake.

Clean food processor thoroughly.

Next, pulse together the cream cheese, sugar, and Nutella until smooth.  Take a taste and add additional Nutella if you wish.

Add chocolate chips and pulse until ground into fine bits.

Divide the cheese cake between the ramekins.  Cover and chill for six hours or until set.

Remove from fridge and let set on the counter for 20 minutes before serving.

(Thanks to The Gluten Free Scallywag for this epic recipe.)


It's that good!


Monday, September 16, 2013

Roll The Tape, Timmy!

Here are a few EXCITING new uses for tape!!!

1) Electrical tape comes in a variety of colors these days, so when your are having guests over use your collection to tag drink cups to avoid awkward mix ups!

2) When you tighten your belt does the tail hang low? If it does, try some double sided "fashion" tape to keep it in place.

3) Protect your plaster!  When hanging your next family photo or piece of artwork place a piece of scotch tape on the spot where the nail will be driven.  It will prevent cracking and chipping.

4) Did you eat your Triscuits over your keyboard and now it is full of crumbs and stuff?  Try sliding a long piece of transparent tape between the rows of keys.  The sticky side will pick up dust and food particles in a jiff!

5) Does your luggage look like everyone else's at the airport?  Help make baggage claim easier by adding a unique strip of colorful or patterned duct tape to your bags to help them stick out!

6) Next time you have spare screws left over from assembling your latest IKEA find, try storing them between layers of clear packing tape.  You can even label your packets to make finding them in the future easier!

Bonus Random Tip:  Connie was trying to pour the glitter from our glitter station back into its respective containers.  It took her a week to organize the particles into color groups and she didn't want to mess up her work.  The office was fresh out of funnels that day so Wendell (always willing to be Connie's mindless slave) quickly folded over and rolled a piece of aluminum foil from our foil station into a gleaming, silver funnel!  Connie was thrilled and the next three months of glitter sorting was avoided.  Thank you Wendell!  We know what a snit Connie gets in when she is assigned glitter sorting duties.


Wednesday, August 7, 2013

Food Tip Round Up!!!

Here are some wonderful food/kitchen tips our research and development department have come up with!

  1. Flatten chicken breasts by placing them between two thin cutting sheets and pounding with a heavy skillet or sauce pan.
  2. A potato ricer works just as well if not better for juicing limes or lemons.
  3. Before juicing aforementioned citrus fruit, pop them in the microwave for ten seconds to optimize the juice!
  4. When cooking on the grill, place meat and veggies about 4" from the heat source and poultry 6"-8" away.  Don't forget dark meat takes longer to cook then white meat.
  5. Need to serve soup to the masses but don't have the proper serving dish, try pouring into an insulated ice bucket.  It works great for hot or cold soups.
  6. Contrary to popular opinion, do not add oil to your pasta water.  It will prevent the sauce from sticking!  You need the extra starch in the water, stir frequently for the first few minutes to keep the pasta separated.
  7. Don't overcrowd the pan when sauteing and searing meats and veggies.  You will end up steaming them instead of the desired effect.
  8. Fresh herbs, such as basil keeps better and longer at room temperature with stems in water.
  9. Season in stages to bring out the best in your ingredients and produce the most flavor.
  10. When cooking cauliflower add a splash of milk to the water.  It will keep the cauliflower bright white.  Shock it immediately by soaking it in ice water.
  11. Extend the life of your salad greens by wrapping them loosely in a damp paper towel and place them in a plastic, resealable bag.
  12. Store your onions and potatoes separately.  The gases released from onions will spoil your potatoes faster.
  13. For mashed potatoes, boil them, drain them, and return them to the hot covered pan for 5 minutes.  This steams them and dries them out.  When you mix in your butter and cream/milk, the texture will be perfect and the absorption spot on!
  14. Cook the perfect hard boiled egg every time!  Place your eggs in a pan of cold water just high enough to cover the eggs.  Next, bring the water to a boil.  As soon as the water boils, turn off the heat and cover the pan.  Set a timer for 15 minutes.  When the timer goes off, place the eggs in an ice bath for approximately 5 minutes or until the eggs are cool enough to handle.  Crack the shells completely on the counter.  The shells will peel off like butter and the yolks will be sunny yellow with no ugly greish green ring.


Sunday, July 28, 2013

Random Tip Round Up!!!

1.) Stop Loose Buttons in Their Tracks:  Avoid losing a button on your favorite button up shirts by coating the center of the buttons with a drop of clear nail polish.  Once it dries it will prevent the threads from fraying over time.  You can also tip unraveling ends of shoelaces in clear nail polish to seal them.

2.) Personalized Mugs In a Flash:  Adding a personal touch to your coffee cup has never been easier!  All you need is a plain, white, ceramic mug and a Sharpie marker.  Simply add your personalized message or design to the mugs exterior with the marker and bake in the oven at 350 degrees for 30 minutes!  Remember to hand wash the mug once personalized!  If you forget, no worries!  The worse that can happen is the design fades over time and you will simply need to touch it up and re-bake it!  The ideas are limitless!  Use a large array of colored Sharpie markers to make colorful designs.  These personalized mugs can make a great gift for friends and family!  They would make a stellar house warming present too!  Don't forget teachers too!

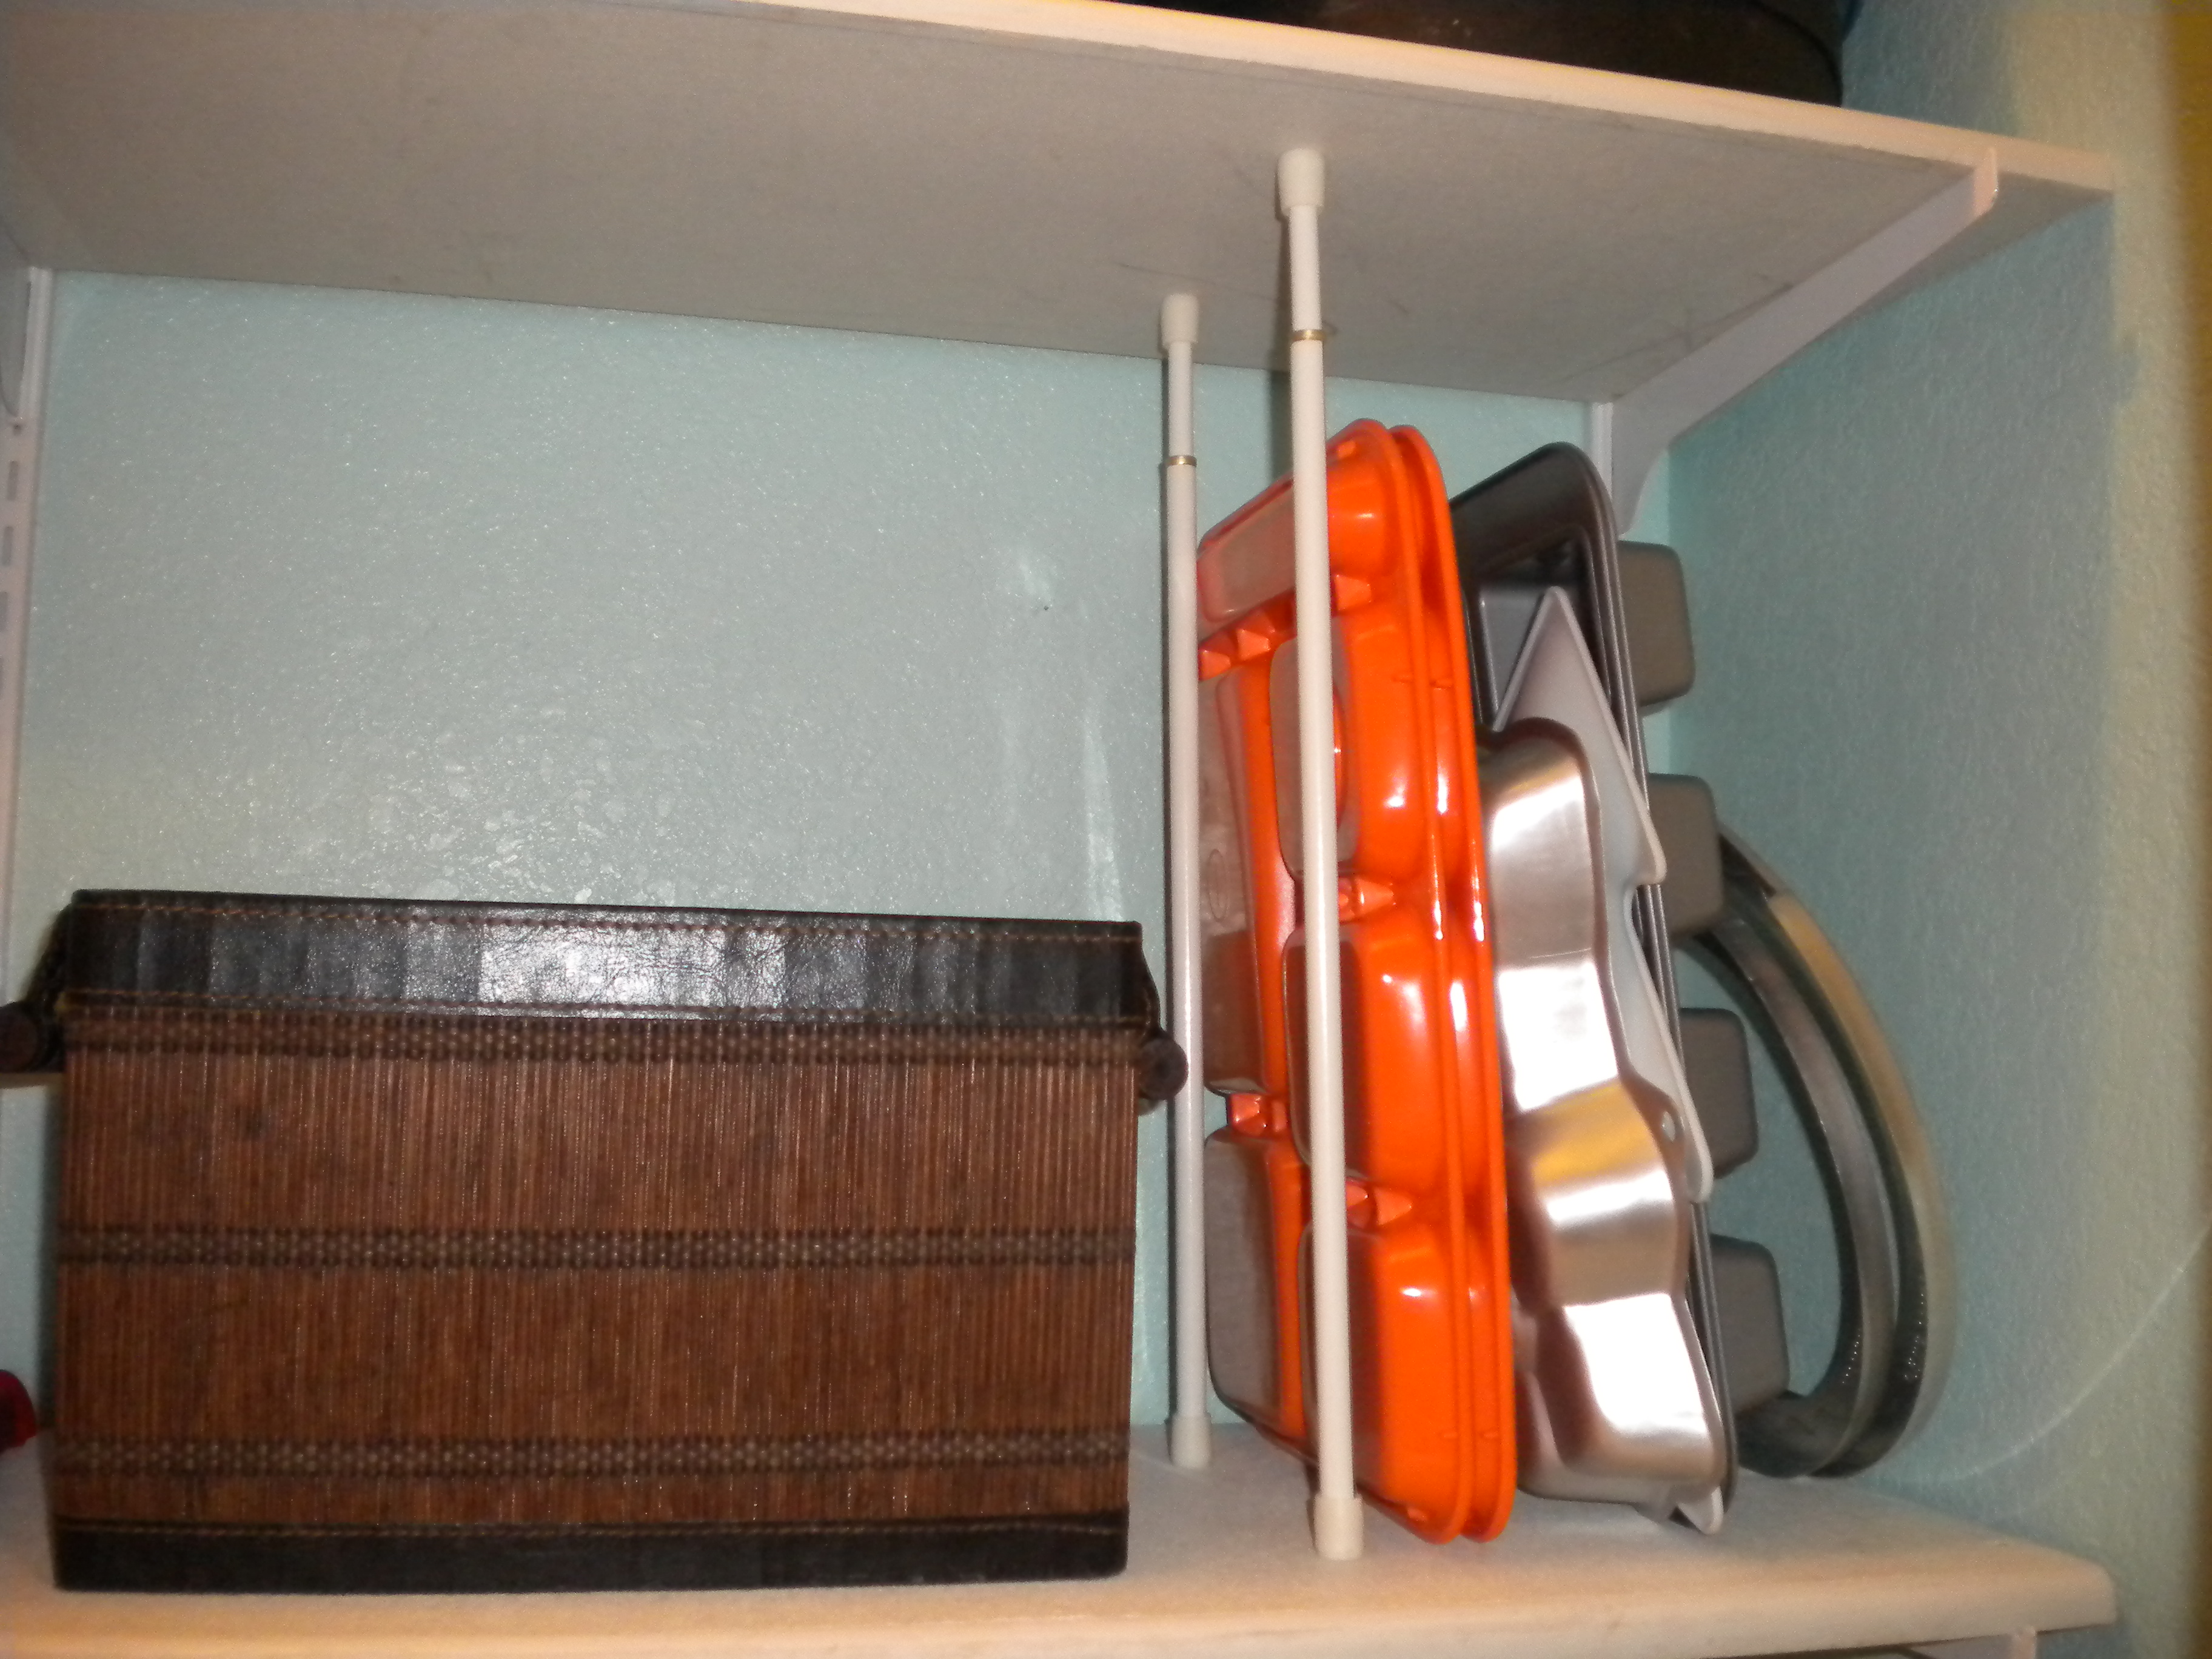
3.) Organize Your Kitchen Shelves In A Jiff:  Use a pair of short, spring loaded, adjustable tension rods to divide your shelves helping to coral all your platters, baking sheets, and cutting board vertically!  Remember, you'll need at least a pair for each division.


4.) Never Let Your House Plants Dry Out:  Breathe new life into old glass bottles by re-purposing them as watering globes!  Fill the bottles with water, invert them quickly, and stick them into the soil of your potted plants, hanging baskets, and container gardens.  Science and gravity will do the rest.  Refill as necessary.

5.) Clean Cut...Brownies:  To get a clean, crisp edge when cutting your next batch of brownies try using a disposable plastic knife while the brownies are still warm.  They will cut like butter!

6.) Don't Get Caught In A Sticky Situation:  Next time you find yourself with gum stuck on your clothing try this trick.  First remove the piece of clothing and place it in a sink or basin.  Boil some vinegar and pour it over the effected area while it is still hot.  Scrub vigorously and the gum should come off almost instantly! Use caution and common sense, don't burn yourself.


Sunday, July 7, 2013

MEAL OF THE MONTH: JULY


Hello to all our loyal listeners!!!  We are excited to be back after our mid-summer hiatus!  Everyone in the office took some much needed time off to travel and relax.  Timmy, spend his time off as lead camp counselor of Camp Hop To It, a survival camp for polliwog enthusiasts.  Connie went to Saudi Arabia to attend a women's rights conference.  Ironically she returned wearing a burka and refusing to drive.  hmm, strange!  Wendell went to tap dance camp and wants to "tap" a "liberated"Connie.  Kathleen spent vacation fishing in Fiji.  Finally Michael took a cruise to Novia Scotia (eh?).

Anyone can top a hot dog with ketchup, mustard, and relish but you can't top these great new ideas from our friends at Good Housekeeping Magazine!

1.) Pimento-Cheese Dogs:  Combine 1 1/2 cups shredded cheddar, 1/4 cup minced, jarred pimientos, 4 tbsp mayo, and 1/2 tsp of hot sauce.  This should cover 4 hot dogs!

2.) Everything Bagel Dogs:  Beat 3 tbsp cream cheese, 2 tbsp milk, 1/4 tsp salt until smooth.  Divide among 4 hot dogs and sprinkle with poppy seeds and 2 chopped green onions.

3.) Spicy Blue Cheese Dogs:  Combine 1 cup chopped celery, 1/4 cup mayo, 1/2 tsp cider vinegar, 1/2 tsp hot sauce, 3 ounces crumbled blue cheese.  Divide among 4 hot dogs.

4.) BLT Dogs: Divid 1/4 cup mayo, 1/2 cup sliced romaine, 1 chopped tomato, and 6 slices, crumbled, cooked bacon among 4 hot dogs.

You could explore some ideas we brainstormed here in the office:

- Grilled vegetables (Vermont Veggie Dog)
- Guacamole (California Dog)
- Coleslaw or potato salad (store bought or homemade) (Down Home Dog)
- Fresh salad ingredients such as cucumbers (Re-Fresh Dog)
- Nacho Dog: Top with crushed tortilla chips, salsa or queso sauce, and sliced, pickled jalapeno slices
- Bacon Dog:  Wrap your hot dog in slices of bacon and grill until perfection.
- Caprese Salad Dog: Top your dog with fresh, chopped mozzarella, chopped tomato, and basil.
- Shanghai Dog:  Saute shredded bok choy, carrots, and mushroom.  Mix with teriyaki sauce.  For an extra kick, add siraracha hot sauce!
- Mac N' Cheese Dog:  This one's for the the kids (or kids at heart).  Top your hot dog with left over macaroni and cheese and a thin, dill pickle slice.

Get grilling tonight!


Sunday, June 9, 2013

Picture This: Tips For Creating a Gallery Wall!

We have all seen a gallery walls in a magazines and envied their symmetry or perhaps their intentional eclectic mix of frames and sizes that just seems to work so perfectly!  Here are some tips that will help demystify and help you to create that perfect curatorial look!

  1. Plan Your Arrangement!  Avoid making too many unnecessary nail holes in your wall by first tracing your framed photos or art on paper.  You can then you can tape these to the wall and help play around with your arrangement before you commit!
  2. Space Them Out!  Do you want a cluster of art to read as one piece?  Do you want them to form a line across the room?  Let your arrangement dictate spacing.  Make sure they aren't too crowded but also not too far or else they will look sparse.  
  3. Theme It!  You can organize your collection in a number of ways.  The first being content.  All your artwork or photos can pertain to a particular item or memory for example a vacation to Cape Cod.  You can also organize your wall by the color story of the actual work being framed for example all the art/photography's primary color is green.  For this theme, you don't want the frames to distract from the overall color read of the grouping.  Finally, you can unite a collection of seemingly random art/photos by framing them all in the same colored frames.  Another way is to pick a variety of fun colored frames that work with the art but also enhance the over all experience.
  4. Mix It Up!  Use a wide mix of frame shapes and sizes.  Also hang items vertically and horizontally. Kick up the grouping by adding artifacts among the framed work.  
  5. Center It (If You Want To)!  You can be traditional and start with the piece you want in the center of the grouping and work out.  That said, rules are meant to be broken!  You could have a collection wrap around a corner, using that corner as the center.  You also could start near the ceiling with a small picture and work down the wall increasing the size of the work creating a pyramid effect.  
  6. Scale It!  Keep your work withing a balanced range.  If you want to incorporate a larger piece make sure the wall is large enough and you include other pieces of a complimentary scale.
Gallery wall in Michael's Apartment.  Michael used content to unit this grouping: Cape Code & Provincetown!

Sunday, June 2, 2013

Experimenting With Garden Whimsy!


 Last year, I decided to experiment with ways I could make my garden look a little more whimsical.  It was really to distract people from the weeds I wasn't ready to pull.  I started by buying a piece of 1/4 inch plywood at my local hardware store.  Then I drew some funky designs and cut them out using my band saw.  This was pretty work intensive to say the least.  After they were cut out, I painted the designs with acrylic craft paint and when I was finished, I screwed them onto a piece of  2x1 furring.  Unfortunately, I didn't leave a piece of the support showing at the top so when I tried to hammer them into the ground it was very difficult not to wreck the art work I had just created.  I also used a poly clear coat to help them weather the elements. Needless to say, next year I got wiser!


This year, I went to my local garden supply store and purchase pre-fabricated wooden stakes which come in various lengths.  I also visited my local arts and crafts store and picked up pre-cut plywood rounds to make my life easier and avoid the band saw.  (See both above)


Not having to use the band saw gave me a level of creative that I didn't experience with the previous incarnation.  It allowed me to add funky, geometric backgrounds and fanciful florals to my designs. 


 Notice that this time I left a "hammering" knob at the top of each so I could pound them into the ground easier and without ruining my artwork.  To achieve the crisp look, I outlined my work with a permanent marker such as a Sharpie.  Instead of screws to fasten the art to the posts I used small nails.  Goodbye drill!  To seal the artwork, this year I used a poly-spar (used for boats).  By making these improvements, it made the whole process faster and a lot more fun.  No more headaches!


Voila, the completed project!!!

- KATHLEEN

Sunday, May 12, 2013

MEAL OF THE MONTH: MAY

This month's meal isn't really a meal at all but rather an introduction to the meal: DIP! The staff at CELEBRATE have curated some of the best dip recipes to help you take advantage of the fresh, bounty of crunchy summer produce heading our way!

Chablis Cheese Dip

8 oz Liederkranz cheese
8 oz softened cream cheese
1/4 tsp celery salt
1/4 tsp garlic salt
1/4 Chablis wine 

Use mixer to blend first four ingredients.  Add Chablis a little at a time and beat for three minutes.  Place in a very clean container.  It will keep for about a week.  The flavors meld the longer it sits.

Tuna Cream Dip

6 oz cream cheese
1/4 tsp Tabasco
3 tbsp mayo
1 can Tuna (approx 6 oz), drained.
1 tbsp lemon juice

Mix well and refrigerate until served.

Calico Dip

1/2 cup sour cream
1/4 cup salad dressing (such as Miracle Whip)
1 tsp sugar
1/2 tsp salt
2 tbs minced scallions
2 tbsp minced radishes
2 tbsp minced cucumber
2 tbsp minced green pepper
1-2 cloves garlic

Mix well, refrigerate, and serve.

Embassy Dip

1 lb cream cheese
1 can condensed black bean soup
1/2 tsp oregano
1/8 tsp chili powder
1 tsp grated onion
1 tsp salt
2 tbsp Worcestershire Sauce

Blend and refrigerate.  Increase oregano and chili powder to taste if you desire.

Hot Crab Meat Dip

8 oz cream cheese
6.5 oz can crab meat
Dash of Worcestershire Sauce
Lemon juice to taste
Sherry to taste if desired

Mix all ingredients and place in small casserole.  Bake at 350 until cream cheese is gooey (approx 20-25 minutes).  Serve warm.

Curry Dip

1 cup mayo
1/4 cup sour cream
1/8 tsp turmeric
1 tbsp curry powder
1 clove, crushed garlic or 1/2 tsp garlic powder
2 tsp sugar
1 tsp salt
1 tsp fresh lemon juice
1/8 cup minced, fresh parsley or 1/2 tsp dried.

Mix well and let "ripen" in refrigerate for a few hours.

Easy Curry Dip

2 cups mayo
3 tbsp ketchup
1 tsp curry powder
2 tbsp of honey
8 drops Tabasco
3 tsp minced onion

Mix and refrigerate.

Cucumber Dip

1 small cucumber. peeled, seeded, and minced
1/2 tsp salt
1/2 pint sour cream
2 tbsp minced chives
1 tbsp each, lemon juice and minced fresh dill weed.
1/4 tsp white pepper

Sprinkle cucumber with salt.  Let stand for an hour and drain in a strainer.  Combine with remaining ingredients and chill.

Red Caviar Dip

8 oz softened cream cheese
1 cup sour cream
4 oz red caviar (salmon roe)
2 tsp Worcestershire Sauce

Mix and chill.

Basil Cottage Cheese Dip

2 cups cottage cheese
2 tbsp vinegar (such as red wine or apple cider)
1/4 cup chopped scallions
2 tbsp chopped parsley 
6 -8 fresh basil leaves or 1 tsp dried, crumbed. 
Salt and fresh ground pepper to taste

Mix in blender and chill.


Thursday, May 2, 2013

Don't Chuck It, Duct It!!!


Here is a great idea we found from our friends at HGTV Magazine! Click the link for more info!
Pictures by Aaron Dyer
Make Art!!!
Think of duct tape as a fully loaded paint brush and paint the town! Open your mind, any flat surface can become your canvas. An old table, door, or storage box.

Add pizzazz to boring bathroom decor!  


We are a really big "fan" of this genius idea!


Make turning off the lights fun!
Rest your feet sitting on this duct up seat! Give your old consignment shop finds an update in seconds. 

Get your organize on, with this chevron!

Hopefully these ideas have gotten your creative juices flowing!  
Submit your ideas and projects to: CELEBRATE! FAN FEEDBACK


Thursday, April 18, 2013

HOMEMADE FOR MOM: MOTHER'S DAY GIFTS FROM THE HEART

Don't take the easy route this Mother's Day and visit your department store.  Instead, try one of these super simple, ultra personal gifts you can make in the comfort of your own home!


  1. Infinity Scarf- Find an attractive, long, narrow scarf at your local boutique, department, or craft store. Sew the ends together, and press.  Voila!  An infinity scarf for half the price of the ones sold at specialty stores!
  2. Hand Stamped Note Cards- Writing a letter is still an art form!  If your mother still writes notes, try making custom note cards by buying blank card sets at your craft store and embellishing them to fit her personality.
  3. Plant Markers- Gather a bunch of paint stirrers (often free at your local hardware store).  Paint them colors that will compliment Mom's Garden. Add a design and the name of the flower or herb they will guard.  Make at set!  If you use acrylic paints, be sure to seal them with a polyurethane varnish.
  4. Personalized Stamp- If you go to your local printer or engraver, you should be able to buy a personalized stamp with her name and address or favorite catch phrase!
  5. Tote Bag- Take a plain canvas tote bag and personalize it to fit your Mother's style!  One idea, lay a paper doily across part of the bag, using it as a stencil.  Using fabric paint or treated acrylic paint stipple over with a stencil brush.  You could also make a design with contact paper.  Adhere to the bag and use fabric spray paint to cover the front of your bag.  Wait until dry and remove the contact paper leaving a ghost like effect of your design.  Another idea is to simply find one of your Mother's guilty pleasures (shopping for example) and create a funky bag that says something like "Oh La La" or  "Ching Ching" with a Dollar Sign.  
  6. Family Tree- Self explanatory.  You don't have to be particularly artistic or do a lot research into your genealogy.  Mom will love it no matter what!
  7. Memory Wire Bracelet- Buy a length of "memory" wire from your local craft store.  Fill tightly with colorful beads that match you Mother's favorite colors!  Bend each end into a loop.  "Memory" wire is tough to cut so be sure to use real wire cutters.  Be sure your loops are well made as not to snag Mom's favorite blouse.  Tada! 
  8. Reshaped Cardigan- If Mom's recently lost weight but doesn't want to throw away her favorite cardigan or top.  Gather the fabric in the back and clothes with a fashionable brooch. 
  9. Homemade Truffles- Google a recipe, they are so simple!  Buy a fancy box and candy papers at a craft store!