Total Pageviews

Tuesday, November 4, 2014

Enhance The Big Meal of The Month!

Thanksgiving can be so delicious but also a huge amount of work and effort to pull off.  We decided to curate a collection of quick and delicious side dish recipes to enhance your Thanksgiving feast without all the work!

Maple Orange Cranberry Sauce

2 bags (12 ounces each) fresh or frozen cranberries, thawed
1/2 cup sugar
1/2 cup maple syrup
1/2 cup orange juice
1 tbsp finely grated orange peel
1/4 tsp salt
1/4 tsp pepper

Simmer cranberries, sugar, maple syrup, orange juice, finely grated orange peel, salt, and pepper in medium saucepan on medium-high 10 to 15 minutes or until slightly thickened.
Courtesy of Good Housekeeping Magazine

Our Thought: Make ahead to allow the flavors to fully combine; plus it will be one less thing to make the day of!


Spinach-and-Cheese Puff

Butter, for baking dish
3x 10 ounce packages frozen chopped spinach, thawed and squeezed dry
1 1/2 cups half-and-half
3 large eggs, lightly beaten
1 1/2 cups coarsely grated Gruyere cheese (about 6 ounces)
Coarse salt and ground pepper
1/4 tsp ground nutmeg

1. Preheat oven to 350 degrees. Butter a shallow 1-quart baking dish.

2. In a large bowl, combine spinach, half-and-half, eggs, 1 cup Gruyere, 2 teaspoons salt, 1/8 teaspoon pepper, and nutmeg; stir to combine. Spread evenly in prepared baking dish, and top with remaining 1/2 cup Gruyere. Bake until set and top is golden brown, 30 to 35 minutes.

Courtesy of Martha Stewart

Our Thought: We chose this because it's a "dump and stir" recipe that uses a single bowl and it only takes minutes to prepare!

Butter-Pecan Sweet Potatoes

8 medium sweet potatoes (5 pounds)
2 tbsps olive oil
Coarse salt
2 tbsps butter, cut into small pieces
2 tbsps light-brown sugar
1/3 cup pecan pieces
1/8 tsp cayenne pepper

1. Preheat oven to 400 degrees. Peel potatoes and halve lengthwise; slice crosswise 1/2 inch thick. On a baking sheet, toss potatoes with olive oil; season with coarse salt.

2. Transfer half the potatoes to a second baking sheet; cook both sheets until potatoes are tender, tossing occasionally, 25 to 30 minutes.

3. Sprinkle with butter, brown sugar, pecan pieces, and cayenne pepper, dividing evenly. Bake until sugar is caramelized and hard, about 10 minutes. Gently toss; serve immediately.

Courtesy of Martha Stewart

Our Thought: Make this one ahead through Step 2! Save the room in the oven to finish it off before the meal starts!


Friday, September 19, 2014

Festive Fall Libations!

With the recent chill in the air, we all know that Autumn is just around the corner! We decided to curate a collection of comforting warm beverages!

Melted Ice Cream Hot Cocoa

2 sticks butter
1 cup white sugar
1 cup brown sugar
2 tsp almond extract
2 cups softened vanilla bean ice cream

1) Melt all the ingredients over gentle heat. Whisk until smooth. This becomes your drink base or concentrate.
2) Fill your favorite mug about halfway with the concentrate mix.
3) Add hot water gradually, tasting often until the drink reaches the desired sweetness.  You might have to experiment a few times to get the ratio to your liking.
4) Top with whipped cream and a dash of cinnamon or nutmeg.
*Concentrate can be refrigerated for up to 1 week.

.
Nutella Hot Chocolate

1 cup milk
2 tbsp Nutella spread
1 tbsp hazelnut liqueur (Optional)
whipped cream to top

1) Heat milk to simmering and remove from heat.
2) Add remaining ingredients.
3) Whisk until fully incorporated.
4) Top with whipped cream.

Coconut Milk Hot Chocolate

1 cup full fat coconut milk (the kind in a can)
2 cups almond milk
1/2 tsp vanilla extract
2 tbsp cocoa powder
4 oz fine chocolate of your choice
2-3 tbsp heavy cream (if you're lactose intolerant you can replace this with more coconut milk)

1) Mix milks, vanilla, cocoa powder and cream in a sauce pan.  Heat gently.
2) When the mixture is warm, add rough chopped chocolate.
3) Stir often until the mixture simmers
4) Turn the heat off and enjoy!

Coconut Chai Tea Latte (Care of The Cooking Channel)

1 tsp black peppercorn
8 cardamom pods
8 whole cloves
2 cinnamon sticks
2 inch piece fresh ginger, thinly sliced (optional)
6 black tea bags
1 cup whole or 2% milk
1 cup unsweetened regular or low-fat coconut milk
2 tbsp-1/4 cup light brown sugar, lightly packed

1) Lightly crush the spices and place in a medium saucepan. Add ginger if being used.
2) Add 6 cups of cold water to the saucepan and bring to a boil over high heat.
3) Remove from heat and add tea bags. Steep for 5 minutes.
4) Remove tea bags and let steep for 10 minutes.
5) Add milks and sugar into separate sauce pan and bring to a simmer.
6) Strain tea mixture into milk mixture using a fine mesh sieve. Heat through for 1 minute.
7) Whisk until the mixture is frothy. Pour and garnish with cinnamon sticks.

No-Coffee Pumpkin Latte

1 cup pumpkin puree
1 quart milk
1/4 white sugar
1 tbsp ground cinnamon
1 tbsp vanilla extract

1) Combine all ingredients in a large saucepan over medium heat. Using a whisk to blend well.
2) Heat to a simmer. Do not boil.
3) Serve and enjoy!

Hot Maple Apple Cider


6 cups apple cider
1/4 cup REAL maple syrup (preferably Vermont made)
2 cinnamon sticks
6 whole cloves
6 whole all spice berries
1 orange peel, cut into strips
1 lemon peel, cut into strips

1) Pour cider and maple syrup into a large saucepan.
2) Place spices and peels into the center of a square of cheesecloth. Fold up side and create a bundle, securing with kitchen string.
3) Drop spice bundle into the cider mixture.
4) Place saucepan over moderate heat until cider is hot but not boiling.
5) Remove from heat and discard spice bundle.
6) Ladle into mugs and add additional cinnamon stick if desired.


Sunday, August 3, 2014

Trend Alert: Chalk Paint!


Chalk paint isn't just for blackboards anymore! Chalk finish paint is becoming all the rage in home decor projects from furniture to decor items.  Celebrate's own Michael painted a uninspiring cabinet in his entryway using Americana Decor Chalky Finish paint (again, not chalk board paint) in the color "Treasure."  The process couldn't be more simple. First he just wiped down the cabinet with a damp rag. No additional sanding or stripping was needed. Then he removed the cabinet doors, drawer, and hardware.  He removed the hardware primarily to update it to a more modern look but it did also help prevent pain splattering on it.  Michael then painted the piece with two coats of the paint and finished it a coordinating creme wax.  The best part is the paint and wax are water-based making clean up a breeze!

BEFORE: 


AFTER:

Chalk paint can be used on a wide variety of surfaces such as glass!  Check out these painted and distressed  Ball jars in a spectrum of fun colors.


Sunday, July 13, 2014

Shedding Light on Lampshades!


Lets face it, lampshades are a necessity but they rarely get noticed!  You don't have to settle for how they look right off the shelf (i.e. plain Jane).  Why not have them be an enhancement than just a boring blank canvas next to the sofa!  Here is a list of a few ideas we have put together for you:


1) Bleach Pen: If you start with a colored lampshade, you can paint whimsical designs using an ordinary bleach pen found in the laundry isle of your favorite super market.  Work in small sections to avoid smudges. When the design turns white, rinse away the excess bleach.  Let it dry completely before use. 

2) Watercolors and Pin-pricking: If you start with a paper shade, you can use artist watercolors to paint simple and chic designs onto it.  Let your imagination guide you.  Once the artwork is dry, you can use a pin to perforate along the edge of some of the painted elements so the light can twinkle through.


3) Ombre: Start with a fabric shade. Mix a package of fabric dye according to directions.  Submerge the entire shade in container deep enough to accommodate it.  Set a timer for 10 minutes. Once your timer goes off, remove the shade and place it on an old towel or piece of wax paper.  Poor off 1/3 of the dye and return the shade to the color bath.  Set your timer again for 10 minutes.  Once again, when the timer goes off remove the shade and pour off another 1/3 of the dye.  Replace the shade and leave it in for a final 10 minutes. When finished, remove the shade and allow to completely dry before using it.  


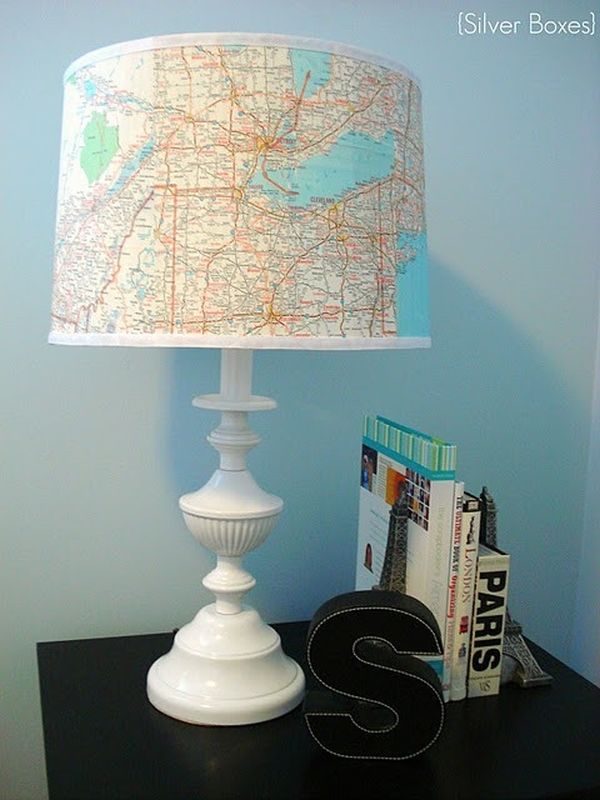
4) Spray Adhesive:  Using spray adhesive, you can add comic book pages, maps, pages from your favorite novels, pieces of fabric, etc. The sky's the limit! Be creative as you personalize your lamp.
                                               

5) Ribbons and Rosettes:  Using your trusty glue gun, you can embellish your lampshade with a row of sweet satin rosettes around the bottom.  You can buy them at your favorite craft store.  If you want a cleaner, more modern look try adding metallic strips or black patent leather trim to the top and bottom edges of the shade.

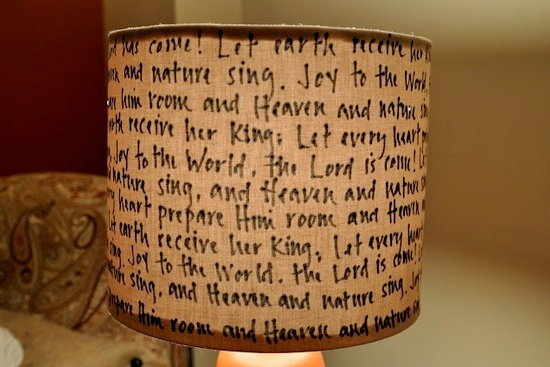
6) Paint Markers:  Use opaque paint markers to draw geometric pattern or lines. Use your lightest color first, let dry and then use a darker color for outlining.  You could also use these markers to write your favorite quotes, belief statements, poems, wishes, etc on the shade for a literary punch!


7) Buttons:  Use hot glue to adhere a variety of buttons or plastic, magnetic alphabet letters (the brightly colored ones kids play with on the fridge) to your shade for a fun pop of color!

8) Satin Ribbon for your boudoir:  Take wide satin ribbon in a color of your choice, anchor a piece inside using hot glue, and wrap your shape vertically.  If your shade is conical, be mindful to overlap the top layers of ribbon as you wrap.  Secure the end of the ribbon again using a dab of hot glue.


Wednesday, July 2, 2014

CELEBRATE: The 4th of July


Here are some great ideas to help make your Independence Day a little more festive from all of us at CELEBRATE!

Life is short, eat dessert first!

American Flag Cake
1 yellow cake mix of your choice
2 pints fresh blueberries
2 quarts fresh strawberries.
2 tubs of Cool Whip topping

1) Bake your cake mix following the manufacturers instructions for a 9x13 sized sheet cake.  Allow to cool completely and remove from pan.
2) Take a large bread knife and carefully cut the cake into two layers.
3) Place the bottom layer back into your 9x13 pan.  Cover in a generous layer of Cool Whip.  Slice 1/3 of your strawberries.  Top the Cool Whip layer with the sliced strawberries and a sprinkling of blueberries. 
4) Place the top layer of your cake over the filling and "frost" this with another generous layer of Cool Whip.
5) Cut the remaining strawberries in half.  Arrange the remaining blueberries in the upper left hand corner in a square.  Next, create red "stripes" using the strawberry halves.  You will want the end result to look like an American flag.
6) Serve and enjoy!

Can't afford that expensive bunting?  Find some inexpensive red, white, and blue fabric and drape, tying every 24 inches!

Make a festive garland!  Buy red, white, and blue construction paper.  Cut the paper into pennant shaped triangles.  Punch two holes in the wide end of each triangle and simple lace together onto cord or rope.

Liven up your table!  Add colorful crepe paper to the edge of your table using double sided tape. 

Create Fantastic Rockets! Fill a decorative bucket or planter with sand.  Next, cover paper towel or toilet paper tubes with red paper of your choice.  Cut a circle out of card stock and make a cut from the outside to the center.  When you overlap the cut edges this, it will create a cone which will become the top of your rocket.  Glue the top cone to the tube.  Glue red, yellow, and orange curling ribbon to the inside bottom of the tube.  These will be your flames!  Finish by gluing your "rocket" to a small dowel.  Stick dowels in the sand of your planter!  

Stars on your lawn!  Create a large star stencil approximately 9-12 inches in size out of cardboard or card stock.  Place your stencil on your freshly mowed lawn.  Using a spray bottle, heavily mist the grass within the stencil.  Next, sprinkle a generous amount of flour over the stencil and remove.  The flour will stick to the wet grass leaving festive white stars!

Place settings that go POW!  Create a fun place setting by placing boxes of sparklers onto white napkins and bundling them together with a festive red ribbon.

Jazz up ordinary bottles of water!  Remove the stick from miniature clothe or plastic flags.  Wrap over the bottle's label and secure.

Enjoy the day and drink responsibly! 

HAPPY 4TH OF JULY FROM ALL OF US AT CELEBRATE!!!

Wednesday, June 11, 2014

Meal of The Month: June

2-Ingredient Nutella Brownies


Ingredients
4 large eggs
1 cup Nutella (slightly less than a whole 13-ounce jar)
Optional: 1 cup chopped nuts
Equipment
8 x 8-inch baking dish
Parchment paper
Nonstick spray or oil
Measuring cups and spoons
Microwave-safe bowl or cup
Stand mixer or hand-mixer
Mixing bowl
Spatula

Instructions

  1. Heat the oven to 350°F with a rack placed in the middle position.
  2. Cut a length of parchment and lay it in your baking dish with the ends hanging over the sides of the dish like flaps. Spray the parchment and sides of the baking dish with cooking spary. (A light spray of cooking spay under the parchment will also help hold it secure.)
  3. Crack all 4 eggs into the bowl of your stand mixer or your mixing bowl. With the whisk attachment, whisk the eggs together. Begin on low speed and gradually increase to medium-high (7 on a Kitchenaid).
  4. Continue whisking the eggs until they become light lemon-colored and billowy, and are tripled in bulk. This will take 6 to 8 minutes (slightly longer if you're using a handheld mixer). The more billowy your eggs, the better the texture will be in your brownies and the less "eggy" they will taste.
  5. While the eggs are whisking, measure the Nutella and transfer it to a microwave-safe bowl. Heat the Nutella for 1 minute, stopping every 15 seconds to stir the Nutella. When warmed, the Nutella should be loose and creamy.
  6. With the mixer on low speed, drop spoonfuls of Nutella into the egg mixture using a spatula. (With a hand-mixer, add a little at a time and mix in between.) Continue mixing until all the Nutella has been added and the Nutella is thoroughly combined with the eggs.
  7.  Use a spatula to stir the mixture by hand a few times, making sure to scrape the sides and bottom of the bowl where the whisk might have missed.
  8. Pour the Nutella mixture into the prepared pan. Use a spatula to scrape the bowl clean.
  9. Transfer the dish to the oven and bake for 25 to 30 minutes. The brownies are done when they start to pull away from the sides of the dish and a cake tester inserted into the middle of the brownies comes away clean.
  10. Let the brownies cool as long as you can. They are delicious while still warm from the oven, but will easily fall apart. For sturdy brownies, wait until they are completely cooled before cutting or removing them from the pan.
  11. Store brownies in an airtight container at room temperature for up to a week or so.

Thanks to The Kitchn for this month's recipe!

Wednesday, May 28, 2014

Idiot Proof Art!


Art doesn't have to be complicated or complex!  Not every piece needs to be the next Monet or Botticelli.  Art should be about expression and should be fun.  We have several ideas that will help you create fun wall decor and will also help to inspire and ignite your inner artist.

1)  Simple images created on Microsoft Paint (which comes pre-installed on every computer) can be printed, cut out and pasted onto colorfully paint canvases. The examples below were created for a bathroom and were super easy to create.  We suggest using latex, acrylic, or spray paints to color your canvas.  These paints are easy to use, dry quickly, and have great coverage. Be sure to apply a coat of clear acrylic sealer such as Modge Podge over the top to seal the work.

2) Circles Two Ways.  Don't hesitate to play around with geometric shapes. Take your canvas, draw a line from one corner to another, dividing the canvas into two triangles.  For the picture below, one triangle was painted grey and the other was painted black.  Once this is dry, use a circle template or various size cups to trace concentrically smaller circles from one corner to the next.  Paint the circles yellow and voila!  To achieve this look, you could also start by painting the whole canvas yellow.  Next, cut out various sized circles from contact paper.  Apply the circle "stickers" to the canvas, press the edges tightly. Finally, paint each triangle, black and grey using a small foam roller.  If you are spray painting, be sure to cover the first painted side before spraying the next to avoid paint misting. 


3) Stencils! Don't be afraid to use them.  You can find a wide selection in your local craft store, at yard sales, etc.  
4) Tape Art!  Its super easy.  Cover your canvas randomly with tape, again press the edges firmly to avoid bleeding.  Paint over the canvas as you see fit.  In the painting below, the tape was applied to an unpainted canvas to create white lines.  You could paint your canvas first, then tape, then paint again to create colored lines.  If the edges aren't crisp, just use a ruler and a permanent fine tip marker to clean up the edges.
5) Bubble Art!  Its just like blowing bubbles in your milk as a kid and just as fun.  Mix 2 tbsp of tempera paint, 2 tbsp of liquid dish soap, and 1/2 cup of water in a shallow ball.  Using a straw, blow bubbles into the mixture until they reach over the top.  Next, lay the paper or canvas over the top of the bowl to pick up color from the bubbles as they pop.  
Thanks Better Homes and Gardens for this image!
6) Get sticky!  Paint your canvas a color of your choice.  Next, apply stripes of patterned washi tape, large circle stickers, etc onto your canvas.  You can then seal your masterpiece with a clear coat!  


Sunday, May 18, 2014

Happy Spring!


HAPPY SPRING FROM ALL OF US AT CELEBRATE!!!


Meal of The Month: May 2014


GINGER, TURMERIC SPICED SPRING CARROT SOUP

Courteousy of gourmandeinthekitchen.com
Ingredients
  • 2 Tablespoons coconut oil
  • 2 to 3 small green onions, white and light green parts only, cleaned and chopped
  • 1 or 2 cloves of garlic, minced
  • 1-inch piece of ginger, peeled and grated
  • A pinch of red pepper flakes
  • 1 ½ pounds young carrots, sliced 1/2 inch thick
  • 1 tsp fine sea salt
  • ¼ tsp ground cinnamon
  • 1-inch piece of turmeric root, peeled and grated (or use ½ tsp ground)
  • Freshly ground pepper to taste
  • 4 cups (1 quart) filtered water
  • ¼ cup plain yogurt or full fat coconut milk for serving
  • Chopped flat leaf parsley or carrot fronds for garnish
Instructions
  1. Melt coconut oil in a medium saucepan over medium heat. Sweat the green onions, garlic, minced ginger, and pepper flakes for 1 to 2 minutes or just until glossy. Do not brown or develop color.
  2. Add carrots, salt, cinnamon and turmeric and cook another 1-2 minutes, stirring occasionally. Add water and bring to a boil. Reduce heat, and simmer until carrots are very soft, 20-25 minutes.
  3. Puree soup in batches in a high speed blender.
  4. If serving cold, chill soup for at least 3-4 hours or overnight.
  5. Divide soup between 4 to 6 bowls and place a spoonful of yogurt or drizzle of coconut milk in center of each and finish with chopped parsley or carrot fonds and a pinch of additional salt and freshly ground pepper if desired.

Ginger Turmeric Spiced Carrot Soup Recipe from gourmandeinthekitchen.com carrots soup ginger Ginger, Turmeric Spiced Spring Carrot Soup Recipe

Sunday, April 20, 2014

Eye Sore No More!

Here are a few ideas to camouflage those ugly, household necessities!

1) The fuse box in your apartment or condo is very important, but not very attractive!  Create a hinged door using a chalkboard, painting, or large framed photo.
2) Your thermostat is essential to daily life but it typically isn't a style object.  Try covering up with a press-board "cigar" box. Cut a hole in the box's lid large enough for the thermostat.  Next screw the lid to the wall around the unit allowing the box to act as a cover that can be flipped up!  You can decorate the outside of the box as you would like to match your decor!  You can also cover your thermostat with a deep stretched canvas.  Using a level, measure and place two nails on either side of  the wall next to the unit.  You could even use push-pins if you're a renter.  Next hang the appropriate sized, decorated deep canvas over the thermostat.

3) We all have speakers these days with surround sound systems for our TVs and other speaker systems for other audio systems.  These speakers are getting more eye pleasing but they often times still do not blend into your decor.  For small wall mounted speakers, you can create a deep box from pine framing.  You can then stretch any light weight fabric over the frame like an artist canvas and staple it into place.  The sound will pass through the fabric easily.  If you have larger, floor speakers from older stereo systems you can also spruce these up.  Create a box from 1/4 inch plywood and add a piece of lattice to the front of the box.  Of course the back of the box would be left open to allow you to slide the cover over the speakers.  Paint the cover to match your home.


4) The wireless router is fundamental in today's home but like speakers they are not always attractive.  You can hide your router in a wooden or press-board "faux" box.  You see these storage boxes disguised as books a lot at home decor stores.  Simply make sure to drill or cut holes for heat ventilation and for cords to pass through.  If you are ambitious, you can hollow out a large book you might find at early spring yard sales.

5) Finally, we can all agree that we can not live a civilized life without toilet paper but it just isn't visually attractive when sitting on the back of your toilet!  Try wrapping spare rolls of toilet paper in decorative tissue.  The tissue can be customized to your decor and can even be switched out during holidays!

Wednesday, March 26, 2014

What a great idea! Innovative Organization Ideas

This afternoon, we were organizing the Vanna White Fiber Crafts Room at our Colchester headquarters and the ideas just began to flow like sap in the spring time (a little Vermont humor)!
  1. We were organizing our extensive thread inventory into drawer units and realized we could only see the tops of each spoil.  How can we tell them all apart?  We raced to our antique jam jar filled with magic markers and began color coding.  We colored all the blues blue, yellows yellow, etc.  Now we can quickly spot color groups and locate the exact color we are looking for quicker!
  2. Marking the thread inspired us to take a look at our craft paints which were also stored in drawers.  Similar to the thread, we had to pull out several bottles before finding the right color.  Our solution? We painted the top of each bottle cap with a dab from it's contents.  Now we can easily locate that bottle of Moss green! 
  3. After organizing our thread and craft paints, we became tired and needed a caffeine boost.  We went to the staff kitchen to grab a cup of coffee to go and couldn't seem to find the coordinating top for the travel mugs.  How do we solve this dilemma? Nail polish!  Once you have paired each set together, color code each set with a dab of nail polish...red dot bottom, red dot top, pink dot bottom, pink dot top and so on.  
  4. We took our coffee back to the craft room to continue our organizing quest.  We found a bunch of embroidery floss.  Most of it was partially used and getting tangled.  Our solution?  A photo album with pages that have multiple pockets.  We separated the colors and slipped them into each pocket.  This now allows us to flip through and locate the perfect floss quickly.
  5. We have ALOT of button, don't ask, don't judge.  We had been keeping them in a wholesale pickle jar.  We ever we needed a button, we would task Timmy, our intern to search for it.  He would have to dump out the entire jar and it took a lot of overtime.  Our solution? Small matching buttons are now threaded onto large safety pins.  Others are sorted by color and placed in zip-lock style bags and stored in plastic shoe boxes.  Now Timmy can find the buttons in a flash!
  6. We had several full and partial skeins of yarn.  They had all been tossed in a large plastic bag.  Again the whole bag would need to be dumped out and untangled to find that perfect shade of fushia.  Our solution?  Sturdy file boxes which stack nicely and are not heavy when filled with yarn.  We snipped a piece from each skein and taped them to the top of the box.  Each skein was then placed in a zip-lock bag to keep them from tangling or picking up fowl odors from the lab.  Now when we need four yards of chartreuse yarn all we have to do is check the box top to see which holds which color.
  7. After all this organizing, we were exhausted but we couldn't figure out what sizes all the different sheets in the lab's dormitory closet were.  Our solution?  Label with a fabric marker and fabric paints.  T for twin, F for full, and so on.  We marked the sheets in an area that would be tucked in and hidden from sight.  

Wednesday, March 19, 2014

Meal of The Month: March

Spaghetti Carbonara Casserole


 Ingredients:

6 oz spaghetti broken into short lengths
2 C diced cooked ham
3 TBS Butter
4-6 oz sliced mushrooms
4-6 thinly sliced green onions
4 TBS flour
1C chicken broth
1 C milk
1/2 tsp seasoned salt 
1/4 tsp garlic pepper, dash of cayenne or other hot pepper as desired 
1C shredded cheese

Preparation:

  • Cook spaghetti following package directions. Drain and rinse and mix with ham in large bowl.
  • Melt butter over medium low heat and add the mushrooms. Cook until tender.  
  • Add the green onions.  Stir in flour until blended thoroughly.
  • Gradually stir in chicken broth and milk.  Add seasonings.
  • Keep stirring until thickened.  When ready, combine it with the ham and spaghetti.
  • Stir in the cheese.
  • Bake at 325 for 25-30 minutes, until bubbly and cheese is melted.


Sunday, March 2, 2014

Can't Escape The Tape!

Washi Tape

If you haven't discovered the wonder of washi tape, then you must get on your Magellan boots and start sailing to your local craft shop!  Washi tape originated in Japan and is a decorative, paper tape that is available is an endless variety of colors and patterns!  Here four ideas to help you get started:


  1. Wine Glass Identifiers.  Never mix up your wine or cocktail glasses at your next soiree; wrap each glasses' stem with a different color or patterned tape!
  2. Cord Keeper.  Don't toss out those toilet paper tubes when you finish the roll.  Save them, decorate them in washi tape, and use them to wrangle power cords and other cables.
  3. Jazz up anything, even your office supplies!  Wrap binder clips, staplers, paper clip dispenses, keyboards, file cabinets, etc to make your cubicle survivable! 

  4. Coordinate cords.  Never unplug the wrong thing or waste time searching for the right charging cable.  Add small "flags" to your cables and wires.  You either label the flags or place a piece of matching tape on the coordinating piece of technology (iPhone, Kindle, etc).


Sunday, February 23, 2014

We're Going to The Dogs!


At the CELEBRATE home office, we have a large black Labrador retriever named Panini (don't ask). As we got used to Panini's demands and quirks, we realized we could make our lives and the lives of thousands of pet owners lives easier if we wrote down some of the interesting tips and tricks we have used, created, thought of over time!  Here are a sampling of them!

TIPS FOR BETTER CO-SPECIES COHABITATION:


  1. Pet's absorb through their paws whatever you wash your floors with.  To save puppy pain, rinse your floors using a mixture of vinegar and water.
  2. Beware the following foods and plants are hazardous to your pooch: chocolate, garlic, chicken bones, sugar free gum with xylital, aloe, ivy, and amaryllis.
  3. Keep your dry dog food in an airtight container.  It keeps out bugs, prevents spills, and stops pup from raiding the pantry.
  4. Panini has a crate but she used to whine watching the busy goings on in the DIY Lab so we draped a light blocking blanket over the crate to create a comfy cave.  Now at nap time, she is happy a grilled sandwich! 
  5. Give your dog it's own plump bed, not yours!  You can make it yourself.  Sew or use iron-on bond tape to create a rectangular pocket the appropriate size of your dog and fill with a mix of fiber-fill and cedar chips.  The cedar chips repel fleas!  Make it soft and plump and your dog will think he's on cloud nine.  Here is another thought for small dogs.  Just use an old pillow of yours you were going to throw away.  Your dog will love how it smells like you.  You can even open the seam a bit to add those handy cedar chips.  In that case, a pillow case would be an easy to wash cover.
  6. When we first gave Panini a bath, we clogged the labs test tub with her fur.  Our solution, we took a small piece of window screening, placed it over the drain, and held it down with a couple pieces of masking/duct tape.  The screening catches the loose fir and makes it easy to remove.  You could also glue heavy washers or small stones to each corner of your screen to weight it down so that you wouldn't need to use the tape.
EASY DIY TOYS:
Dogs like Panini that like to chew things should have their toys rotated frequently to avoid boredom which can lead to chewing of furniture or important experiments that may being going on it the lab.  Oh yea, we learned the hard the way!

Socks: 
  • Take an old sock and add a handful of dog treats to it.  Roll it up, similar to how you would when doing your laundry.  Put the rolled sock inside another.  It will take the dog a while to get through to the treats. 
  • Take a soda bottle (remove the cap), slide it inside a sock and tie the end.  The dog will love the crinkly sound the empty bottle.
Tennis Balls:

  • Take three strips of old t-shirt or fleece (which is incredibly strong) and braid them together into a rope of sorts.  Next, take a tennis ball and cut a hole just large enough to push the braid through tightly.  Knot the braid on  both ends.  You can toss this around like a fox tail toy.
  • Place several tennis balls in a deep muffin tin.  Your pup will spend hours trying to figure out how to free the balls from their enclosures.
Paper Towel Tube/PVC Pipe:

  • Put snacks inside a paper towel tube.  Press the ends of the tube flat.  Cover the whole thing with duct tape and give it a toss!  The dog will love trying to get at the snacks.
  • Take a PVC pipe, place dried beans inside and cap both ends.  It makes a great rattle!
Plastic:

  • A plastic milk jug that is rinsed and has the cap removed makes the cheapest and quickest dog toy.
  • A large plastic jar from your local wholesale super store that would normally have held nuts or candy makes an excellent toy!  Remove the lid and give it a toss.  Your pup will take time to realize she can only grab it from the open end and will have fun chasing it around as you toss it and bounce it all over! 
Ice/food:
  • Try making "doggie pops"!  Freeze beef or chick broth in plastic containers. You can even suspend treats or meat scrapes in the broth for added treat value.  We recommend using low or no sodium broth if you are buying from the supermarket.  Make them in the size that is appropriate for your breed.  They will LOVE them as a treat on a hot day!
  •  Take slices of sweet potato about 1-1.5 inches thick, using a hand held corer put a hole in the center of each slice, and then bake the slices on a lined cookie sheet at 200 degrees for several hours or until the slices have dried and are leathery.  Next, thread the dried potato "rings" onto a length of thick nylon rope.   Knot both end and give it a toss.  Your pooch will love gnawing on this treat. 
 Please note, be responsible and monitor your dog at all times while he or she plays especially with these toys!

Sunday, February 9, 2014

Meal Of The Month: February

Apricot-glazed Cornish hens for two

2 Servings
Prep: 15 min. Bake: 65 min. plus standing time

Ingredients:
1/2 tsp salt
1/4 tsp cayenne pepper
2 Cornish game hens (20 to 24 ounces each)
2 tbsp butter, melted, divided
1/4 cup apricot preserves
1 tbsp honey
1 tbsp grated onion
1/8 tsp ground nutmeg
Method of preparation:
Combine the salt and cayenne. Rub a third of the mixture inside hens.
Brush 1-tablespoon butter over hens; sprinkle with remaining seasoning mixture. Place on a rack in a shallow baking pan. Bake, uncovered, at 350 F for 30 minutes.
Meanwhile, in a saucepan, combine the preserves, honey, onion, nutmeg and remaining butter. Cook and stir until preserves are melted.
Brush over hens. Bake 35-40 minutes longer or until golden brown and a meat thermometer reads 180 F. Cover and let stand for 5-10 minutes before serving.

Sunday, February 2, 2014

Romantic Dinner 101: Valentine's Day


  1. Location, location, location! Anyone can make a reservation at the local French restaurant, but we are going to help you create the perfect ambiance in your own home. Find a non-traditional and unexpected spot to enjoy dinner within your house or apartment.  If you are lucky enough to live in a warm climate, utilize your outdoor space as well. For example, the formal dining room, an intimate nook in the bedroom, the garden, etc.
  2. Use your nicest dishes, flatware, and glassware.  This helps set the "special" feeling of the evening!
  3. Mood music is key.  Put on a classic artist such as Eric Clapton or Sinatra.  Play a record for a special feeling.
  4. Avoid scented candles around your dining area.  Stick with unscented, white candles for a classic look. Make sure however the house does smell pleasant and the temperature is comfortable.  Take out the trash, change the litter box, etc.
  5. For romantic lighting, cluster your pillar candles for the perfect glow. Be sure they are no higher than 12 inches tall.  Scatter votive candles around the room to add ambiance and mood.
  6. Keep your menu fairly simple and prepare as much in advance to save your attention for your special guest.  This also keeps the kitchen relatively neat.  No one wants to spend the evening stuck doing dishes or looking at the mountains of dishes made from the meal.
  7. Make the meal three courses: appetizer, entree and dessert. This makes it feel more special than just a snack.
  8. Make sure you have a pitcher or glasses of ice water flavored with citrus fruits, cucumber, or even basil/mint in addition to wine or cocktails.
  9. Avoid messy and overly rich foods for the meal.  No one feels sexy when they are bloated or if they have greasy fingers from tacos.
  10.  Make sure your timing on the food is just right so everything is served at the correct temperature and time.  Be ready when your guest arrives.
  11. Before your guest arrives, go and dress up in a special outfit.  A nice dress or shirt and tie.  Remember this is a special evening, no PJs or baseball caps.
  12. Make sure to eliminate all distractions including technology, phones, pets, etc.  Send your cats or dogs for an overnight at the kennel or grandma's house.
  13. After your dinner is finished, dance together, watch a romantic movie, or maybe hand dip strawberries together.
  14. Our last tip, our favorite way to start and end a romantic, Valentine's dinner: Chocolate.
      • Chocolate Martini: Take a martini glass and drizzle hard shell ice cream coating on the inside of the glass.  Use both milk and white chocolate varieties to create a pattern. Next, in a shaker combine 3/4 cup half and half or light cream, 1 cup dark chocolate liquor, 1/4 cup vodka, with ice.  Shake to combine.  Strain into prepared glass.  Garnish with a conversation heart.
      • Flourless Fudge Cookies (Courtesy of King Arthur Flour): 
          • 2 1/4 cups confectioners sugar
          • 1/4 tsp salt
          • 1 tsp espresso powder (optional but divine)
          • 1 cup dutch process (preferred) cocoa powder
          • 3 large egg whites
          • 2 tsp gluten free vanilla extra (most pure vanilla extracts should be gluten free)
        • Pre-heat oven to 350 degrees.  Lightly grease two cookie sheet, or line them with greased parchment paper. Stir together all ingredients until smooth.  Scrap the sides and bottom of the bowl and stir again until smooth.  Drop the soft, batter like dough onto the prepared baking sheets in 1 1/2 inch circles.  Bake the the cookies for 8 minutes.  They should spread, become slightly shiny, and develop faintly crackly tops.  Remove from oven and allow to cool on the cookie sheets.  The result is an ultra chewy, rich chocolate cookie with no additional fat or gluten!


Sunday, January 5, 2014

Unconventional Wine Racks

Before you start this project, take a look around your home and decide what style of wine rack will accent your decor the best!  Often the first idea many of us think about when considering building an unconventional wine rack is to somehow gather a bunch of PVC piping together in some fashion using glue or screws.  This idea is wonderful but instead of just joining four tubes together in a square shape, give stab at something more artistic!  See the picture below!  The following ideas we have assembled take a more unexpected course!

1) If you would like to go for the PVC pipe look but want to try other materials, give these a try: black sub-pump lining, shiny aluminum duct, or coffee can with both ends removed.  You can gather these tubes together using airplane cable, large belt, rope, etc.

2) You could create a more organic wine holder by assembling terracotta chimney liners, bricks, or cinder blocks into a unique order!

3) Create a sling or hammock!  Use fabric such as canvas or duck cloth to create pockets in which bottles can be nestled.  You could also do this with belts!

4) Use wood! Find the space you would like to hang a wine rack in and determine whether you will need a 8-12 inch width board (the length of the board will be determined by your space).  Next, purchase several large hose clamps and gather several large coffee cans or soup cans (with both ends removed).  Draw parallel lines in several places along the length of board (approximately 6-8 inches apart). Screw the hose clamps (two at a time) to the board at each end of the parallel lines.  Secure the clamps around the cans and voila!  A vertical wine holder!   You can also drill smaller holes into a plank and stick the necks of the bottles in these smaller holes.

5) Try Tinker Toys or Legos for a fun, whimsical look!

6) A leather or canvas firewood carrier hung from the ceiling with chain or a sturdy pipe or rod could be slid through the handles.

7 ) A sturdy, in and out style mailbox/paper organizer.  Be sure the one you select can bear the weight of several wine bottles.  Check junk stores or antique shops for sturdy metal or wood ones.

8) A spare drawer will work!  Have an extra drawer in your kitchen or buffet (or ANYWHERE)?  Line it with foam and slip some wine bottles in it.

9) A wooden crate, antique or from the local craft store!  Paint, decorate, and divide!

10) Try an antique metal pail! Stencil, design, and voila!

Check out some pictures  of other great ideas below!