Total Pageviews

Showing posts with label ribbon. Show all posts

Sunday, July 13, 2014

Shedding Light on Lampshades!


Lets face it, lampshades are a necessity but they rarely get noticed!  You don't have to settle for how they look right off the shelf (i.e. plain Jane).  Why not have them be an enhancement than just a boring blank canvas next to the sofa!  Here is a list of a few ideas we have put together for you:


1) Bleach Pen: If you start with a colored lampshade, you can paint whimsical designs using an ordinary bleach pen found in the laundry isle of your favorite super market.  Work in small sections to avoid smudges. When the design turns white, rinse away the excess bleach.  Let it dry completely before use. 

2) Watercolors and Pin-pricking: If you start with a paper shade, you can use artist watercolors to paint simple and chic designs onto it.  Let your imagination guide you.  Once the artwork is dry, you can use a pin to perforate along the edge of some of the painted elements so the light can twinkle through.


3) Ombre: Start with a fabric shade. Mix a package of fabric dye according to directions.  Submerge the entire shade in container deep enough to accommodate it.  Set a timer for 10 minutes. Once your timer goes off, remove the shade and place it on an old towel or piece of wax paper.  Poor off 1/3 of the dye and return the shade to the color bath.  Set your timer again for 10 minutes.  Once again, when the timer goes off remove the shade and pour off another 1/3 of the dye.  Replace the shade and leave it in for a final 10 minutes. When finished, remove the shade and allow to completely dry before using it.  


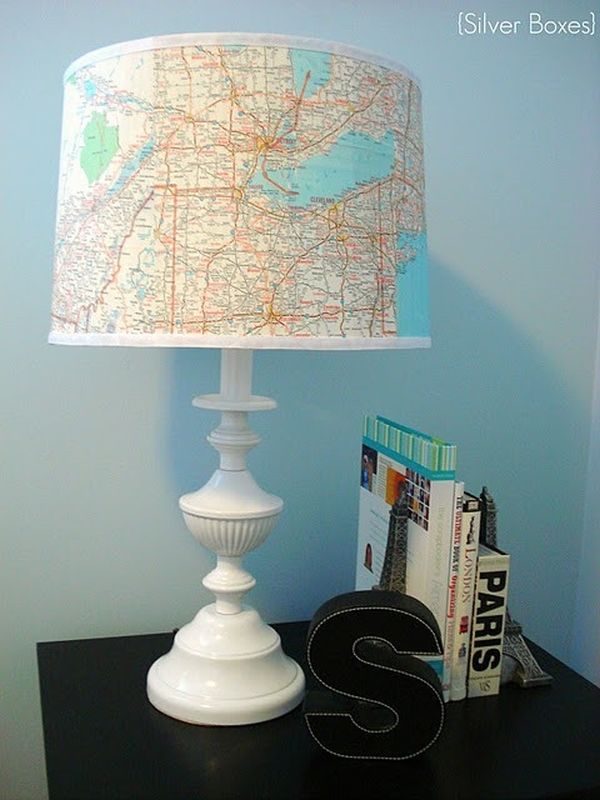
4) Spray Adhesive:  Using spray adhesive, you can add comic book pages, maps, pages from your favorite novels, pieces of fabric, etc. The sky's the limit! Be creative as you personalize your lamp.
                                               

5) Ribbons and Rosettes:  Using your trusty glue gun, you can embellish your lampshade with a row of sweet satin rosettes around the bottom.  You can buy them at your favorite craft store.  If you want a cleaner, more modern look try adding metallic strips or black patent leather trim to the top and bottom edges of the shade.

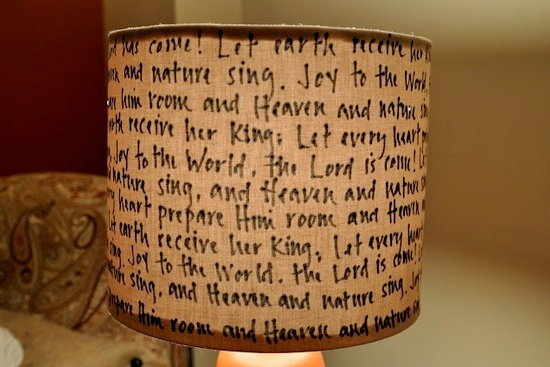
6) Paint Markers:  Use opaque paint markers to draw geometric pattern or lines. Use your lightest color first, let dry and then use a darker color for outlining.  You could also use these markers to write your favorite quotes, belief statements, poems, wishes, etc on the shade for a literary punch!
                                        

7) Buttons:  Use hot glue to adhere a variety of buttons or plastic, magnetic alphabet letters (the brightly colored ones kids play with on the fridge) to your shade for a fun pop of color!

8) Satin Ribbon for your boudoir:  Take wide satin ribbon in a color of your choice, anchor a piece inside using hot glue, and wrap your shape vertically.  If your shade is conical, be mindful to overlap the top layers of ribbon as you wrap.  Secure the end of the ribbon again using a dab of hot glue.


Wednesday, July 2, 2014

CELEBRATE: The 4th of July


Here are some great ideas to help make your Independence Day a little more festive from all of us at CELEBRATE!

Life is short, eat dessert first!

American Flag Cake
1 yellow cake mix of your choice
2 pints fresh blueberries
2 quarts fresh strawberries.
2 tubs of Cool Whip topping

1) Bake your cake mix following the manufacturers instructions for a 9x13 sized sheet cake.  Allow to cool completely and remove from pan.
2) Take a large bread knife and carefully cut the cake into two layers.
3) Place the bottom layer back into your 9x13 pan.  Cover in a generous layer of Cool Whip.  Slice 1/3 of your strawberries.  Top the Cool Whip layer with the sliced strawberries and a sprinkling of blueberries. 
4) Place the top layer of your cake over the filling and "frost" this with another generous layer of Cool Whip.
5) Cut the remaining strawberries in half.  Arrange the remaining blueberries in the upper left hand corner in a square.  Next, create red "stripes" using the strawberry halves.  You will want the end result to look like an American flag.
6) Serve and enjoy!

Can't afford that expensive bunting?  Find some inexpensive red, white, and blue fabric and drape, tying every 24 inches!

Make a festive garland!  Buy red, white, and blue construction paper.  Cut the paper into pennant shaped triangles.  Punch two holes in the wide end of each triangle and simple lace together onto cord or rope.

Liven up your table!  Add colorful crepe paper to the edge of your table using double sided tape. 

Create Fantastic Rockets! Fill a decorative bucket or planter with sand.  Next, cover paper towel or toilet paper tubes with red paper of your choice.  Cut a circle out of card stock and make a cut from the outside to the center.  When you overlap the cut edges this, it will create a cone which will become the top of your rocket.  Glue the top cone to the tube.  Glue red, yellow, and orange curling ribbon to the inside bottom of the tube.  These will be your flames!  Finish by gluing your "rocket" to a small dowel.  Stick dowels in the sand of your planter!  

Stars on your lawn!  Create a large star stencil approximately 9-12 inches in size out of cardboard or card stock.  Place your stencil on your freshly mowed lawn.  Using a spray bottle, heavily mist the grass within the stencil.  Next, sprinkle a generous amount of flour over the stencil and remove.  The flour will stick to the wet grass leaving festive white stars!

Place settings that go POW!  Create a fun place setting by placing boxes of sparklers onto white napkins and bundling them together with a festive red ribbon.

Jazz up ordinary bottles of water!  Remove the stick from miniature clothe or plastic flags.  Wrap over the bottle's label and secure.

Enjoy the day and drink responsibly! 

HAPPY 4TH OF JULY FROM ALL OF US AT CELEBRATE!!!

Wednesday, November 6, 2013

Thanksgiving Tablescape Extravaganza!

First, start off by collecting a supply of interesting fall bounty from Mother Nature like acorns, tiny pine cones, and dried leaves.  Add to this collection by picking up walnuts, gourds, corn husks, etc from your local grocery store. Next, spray paint everything metallic gold or if you have a specific color story whatever fits!  With these supplies you can make any of the following:
  • Napkin Rings: Glue acorns and leaves onto a small branch and affix a satin ribbon is a dot of hot glue.  You could also glue two acorns onto each end of a length of ribbon and tie into a casual bow.  You could affix star-anise (found in the spice aisle of your local grocery store) to lengths of ribbon as well.  These ideas are especially festive if your fold your napkin into a cornucopia/cone shape!
  • Place Cards: Tie a ribbon with a name "tag" onto a gilded gourd or mini pumpkin stem.  Take a fresh pomegranate (you don't have to gild this one) and pin a leaf shaped name tag to the fruit.  Take your gilded walnuts and wedge flag/pennant shaped card stock name tags into the seam between the shells.  Write the names in script for an extra fancy look. 
  • Trivia Turkey Place Cards:  Find a turkey pattern online.  Cut out the appropriate number for your expected guests from card stock.  Create a base by making a one inch cut into the bottom of the turkey cut outs and slip a corresponding cross piece into it.  This will create your traditional cross bar base.  Next create feathers by cutting colorful card stock with pinking shears and on each card write a Thanksgiving trivia question.  You can write the answers on the back side of each feather.   Affix card stock "feathers" to the turkey bodies with a brass paper fastener.  
Use any of your leftover gilding supplies to scatter around your table or group together on other surfaces such as your side board or entry table.

Try making these other festively fall table decor items!
  • Basket of Small White Gourds with Gold Stems: Wrap each stem in painters tape and spray paint the gourds white (or any color really).  Next remove the tape, and hand paint the stems metallic gold.  Arrange in a cornucopia, a rustic wooden bowl, or woven basket (turn it on it's side and "spill" the gourds out for a creative touch).
  • The Modern Approach to Painted Small Gourds/Pumpkins:  Wrap the stems of your gourds or mini pumpkins in painters tape and spray the surface in an array of matte colors.  You can go primary and bold or stick with modern takes on fall colors.  You can stack these colorful beauties in a glass cylinder.  You can also arrange them in a free standing tower.  First, collect 4-5 gourds or pumpkin  in progressively larger sizes.  Next, remove all the stems of the gourds except the smallest which will serve as the top of your tower.  Make sure the base gourd/pumpkin is flat bottomed to ensure your creation is steady.  Take a wooden skewer and press it through the center of the largest gourd, slide the next largest onto the skewer, and so on.  Finish with the smallest gourd/pumpkin with the stem intact on top.  You can make these in varied heights and cluster them in modern trios.
  • Sheaf of Wheat:  Gather approximately 100 stalks of dried wheat (This can be found at your local craft store).  Place a piece of floral wire down first onto your work table.  Next, place your bundle of wheat on top of the wire making sure the wire falls towards the top but below the grain pods.  Tap the top of the wheat pods gently to ensure they are even.  Next, secure the wire around the bundle.  Stand the bundle upright and begin to spread and turn the stems until you have a comfortably large base.  Tie a beautiful satin ribbon over the wire and let it drape along the stems. 
  • Gilded Turkeys:  Buy wooden or resin turkeys and spray paint with metallic gold paint.
  • Squash Gourd Candles: You can use things like acorn squash or other small round (like acorn) gourds.  Next, cut the top off of these gourds and then scoop out as much of the meat and seeds as possible.  You can use a melon-baller or sturdy spoon to achieve this.  Keep the inside smooth and follow the contours of the gourd because this will become your candle mold.  Next, melt old candles or wax with crayons for color and pour this into your gourd molds.  Sink a wick into the candles and drape excess wick over a knife or skewer placed across the opening of the gourd.  This will keep the wick centered.  Candle wicks can be purchased at your local craft store.    Let the wax harden completely (this may take several hours) and then break away the gourd mold.
 

Thursday, January 31, 2013

Out of The Chocolate Box Engagement Ideas

We know that proposing on Valentine's Day can be cliche but here is a list that the staff has compiled that will make it anything but pedestrian and a total adventure of love!

1.) If you live in a part of the country (or globe) where it snows, find a secluded stretch of open, virgin snow.  Fling yourself upon the ground and create two snow angels side by side as if they are holding hands.  Next, place the ring box carefully on the angels connected hands.  Then brush away footprints with a broom or pine branch.  Depending on where your patch of snow is, you might want to have a friend "guarding" the site until you return with your sweetheart to avoid the possibility of winter sportsmen or wildlife disturbing the scene (and they could film the reaction too).  Tell your love, that it's such a beautiful day and that you'd like to take a walk in the woods to take in the snowy scenery.  Then guide your mate (perhaps on snowshoes) to the snow angels and let them ask  "What is that they are holding?"  From that point on you decide the best way to pop the question.


2.) If you live in a warm part of the country or globe, try proposing with a message in a bottle!  Here's how.  Find your destination point along a body of water, preferably the ocean but a lake will do.  Next, find a suitable, wide necked bottle that will allow you to easily remove the note with a finger.  A dry, clear, glass bottle works best.  You can even decorate the bottle with ribbon or other embellishments to make it stand out and catch their attention!  Next, type up your proposal note and antique in coffee or tea (optional; Google how to "age" paper for instructions).  Plant the bottle along the path where you plan to walk.  Again you might need a lookout to keep your bottle safe.  You could also conceal the bottle, distract your mate, and toss the bottle. As you approach the bottle, hope that they notice it.  If not, you will need to bring attention to it.  Have them open the bottle and read the message.  At the same time, drop to one knee and prepare the ring!


3.) The treasure hunt!  This one will require the most advanced planning and execution.  The idea is to give your sweetheart a series of clues to follow in order to reach the ultimate clue which is "Will you marry me?"  For example (use brightly colored envelopes that are easy to spot), hand the first one to your mate and it may say "Go to place where we reached first base!" and let's say it was on the couch sitting on your front porch (yea, we do live in Vermont).  Your love then goes to the couch and searches until Clue #2 is found!  It might say "You sure are a winner, so lets grab your favorite dinner!"  At this point you head off to the restaurant having arranged ahead of time that the waiter bring Clue #3 when he brings you the check...and so on until you reach the big question!  Make sure not to forget the ring!


Monday, October 19, 2009

::Great Concert Keepsake::


Are your scrapbooks busting at the seams? Have concert tickets lying around? Try our great idea for perserving your favorite music memories. Take your favorite concert ticket stubs to your local copy shop and have them laminated. Punch a hole in the top and loop a piece of ribbon through it! Tada, you have yourself a one of a kind bookmark for your favorite gothic novel! Make it your own by adding additional touches like beads and other notions.