Total Pageviews

Sunday, July 13, 2014

Shedding Light on Lampshades!


Lets face it, lampshades are a necessity but they rarely get noticed!  You don't have to settle for how they look right off the shelf (i.e. plain Jane).  Why not have them be an enhancement than just a boring blank canvas next to the sofa!  Here is a list of a few ideas we have put together for you:


1) Bleach Pen: If you start with a colored lampshade, you can paint whimsical designs using an ordinary bleach pen found in the laundry isle of your favorite super market.  Work in small sections to avoid smudges. When the design turns white, rinse away the excess bleach.  Let it dry completely before use. 

2) Watercolors and Pin-pricking: If you start with a paper shade, you can use artist watercolors to paint simple and chic designs onto it.  Let your imagination guide you.  Once the artwork is dry, you can use a pin to perforate along the edge of some of the painted elements so the light can twinkle through.


3) Ombre: Start with a fabric shade. Mix a package of fabric dye according to directions.  Submerge the entire shade in container deep enough to accommodate it.  Set a timer for 10 minutes. Once your timer goes off, remove the shade and place it on an old towel or piece of wax paper.  Poor off 1/3 of the dye and return the shade to the color bath.  Set your timer again for 10 minutes.  Once again, when the timer goes off remove the shade and pour off another 1/3 of the dye.  Replace the shade and leave it in for a final 10 minutes. When finished, remove the shade and allow to completely dry before using it.  


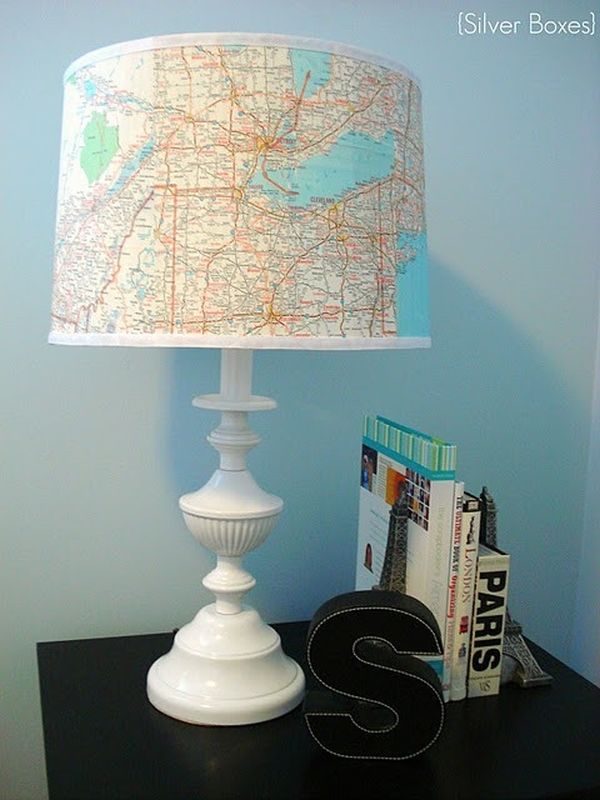
4) Spray Adhesive:  Using spray adhesive, you can add comic book pages, maps, pages from your favorite novels, pieces of fabric, etc. The sky's the limit! Be creative as you personalize your lamp.
                                               

5) Ribbons and Rosettes:  Using your trusty glue gun, you can embellish your lampshade with a row of sweet satin rosettes around the bottom.  You can buy them at your favorite craft store.  If you want a cleaner, more modern look try adding metallic strips or black patent leather trim to the top and bottom edges of the shade.

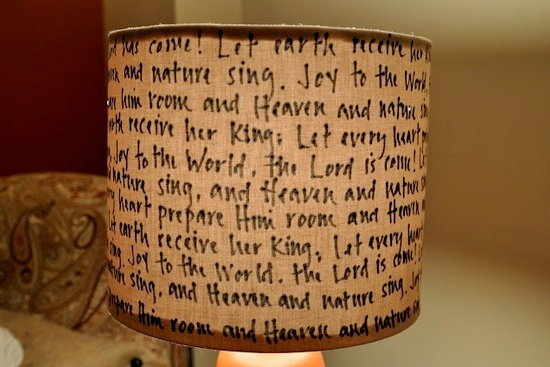
6) Paint Markers:  Use opaque paint markers to draw geometric pattern or lines. Use your lightest color first, let dry and then use a darker color for outlining.  You could also use these markers to write your favorite quotes, belief statements, poems, wishes, etc on the shade for a literary punch!


7) Buttons:  Use hot glue to adhere a variety of buttons or plastic, magnetic alphabet letters (the brightly colored ones kids play with on the fridge) to your shade for a fun pop of color!

8) Satin Ribbon for your boudoir:  Take wide satin ribbon in a color of your choice, anchor a piece inside using hot glue, and wrap your shape vertically.  If your shade is conical, be mindful to overlap the top layers of ribbon as you wrap.  Secure the end of the ribbon again using a dab of hot glue.


Wednesday, July 2, 2014

CELEBRATE: The 4th of July


Here are some great ideas to help make your Independence Day a little more festive from all of us at CELEBRATE!

Life is short, eat dessert first!

American Flag Cake
1 yellow cake mix of your choice
2 pints fresh blueberries
2 quarts fresh strawberries.
2 tubs of Cool Whip topping

1) Bake your cake mix following the manufacturers instructions for a 9x13 sized sheet cake.  Allow to cool completely and remove from pan.
2) Take a large bread knife and carefully cut the cake into two layers.
3) Place the bottom layer back into your 9x13 pan.  Cover in a generous layer of Cool Whip.  Slice 1/3 of your strawberries.  Top the Cool Whip layer with the sliced strawberries and a sprinkling of blueberries. 
4) Place the top layer of your cake over the filling and "frost" this with another generous layer of Cool Whip.
5) Cut the remaining strawberries in half.  Arrange the remaining blueberries in the upper left hand corner in a square.  Next, create red "stripes" using the strawberry halves.  You will want the end result to look like an American flag.
6) Serve and enjoy!

Can't afford that expensive bunting?  Find some inexpensive red, white, and blue fabric and drape, tying every 24 inches!

Make a festive garland!  Buy red, white, and blue construction paper.  Cut the paper into pennant shaped triangles.  Punch two holes in the wide end of each triangle and simple lace together onto cord or rope.

Liven up your table!  Add colorful crepe paper to the edge of your table using double sided tape. 

Create Fantastic Rockets! Fill a decorative bucket or planter with sand.  Next, cover paper towel or toilet paper tubes with red paper of your choice.  Cut a circle out of card stock and make a cut from the outside to the center.  When you overlap the cut edges this, it will create a cone which will become the top of your rocket.  Glue the top cone to the tube.  Glue red, yellow, and orange curling ribbon to the inside bottom of the tube.  These will be your flames!  Finish by gluing your "rocket" to a small dowel.  Stick dowels in the sand of your planter!  

Stars on your lawn!  Create a large star stencil approximately 9-12 inches in size out of cardboard or card stock.  Place your stencil on your freshly mowed lawn.  Using a spray bottle, heavily mist the grass within the stencil.  Next, sprinkle a generous amount of flour over the stencil and remove.  The flour will stick to the wet grass leaving festive white stars!

Place settings that go POW!  Create a fun place setting by placing boxes of sparklers onto white napkins and bundling them together with a festive red ribbon.

Jazz up ordinary bottles of water!  Remove the stick from miniature clothe or plastic flags.  Wrap over the bottle's label and secure.

Enjoy the day and drink responsibly! 

HAPPY 4TH OF JULY FROM ALL OF US AT CELEBRATE!!!