Total Pageviews

Sunday, February 9, 2014

Meal Of The Month: February

Apricot-glazed Cornish hens for two

2 Servings
Prep: 15 min. Bake: 65 min. plus standing time

Ingredients:
1/2 tsp salt
1/4 tsp cayenne pepper
2 Cornish game hens (20 to 24 ounces each)
2 tbsp butter, melted, divided
1/4 cup apricot preserves
1 tbsp honey
1 tbsp grated onion
1/8 tsp ground nutmeg
Method of preparation:
Combine the salt and cayenne. Rub a third of the mixture inside hens.
Brush 1-tablespoon butter over hens; sprinkle with remaining seasoning mixture. Place on a rack in a shallow baking pan. Bake, uncovered, at 350 F for 30 minutes.
Meanwhile, in a saucepan, combine the preserves, honey, onion, nutmeg and remaining butter. Cook and stir until preserves are melted.
Brush over hens. Bake 35-40 minutes longer or until golden brown and a meat thermometer reads 180 F. Cover and let stand for 5-10 minutes before serving.

Sunday, February 2, 2014

Romantic Dinner 101: Valentine's Day


  1. Location, location, location! Anyone can make a reservation at the local French restaurant, but we are going to help you create the perfect ambiance in your own home. Find a non-traditional and unexpected spot to enjoy dinner within your house or apartment.  If you are lucky enough to live in a warm climate, utilize your outdoor space as well. For example, the formal dining room, an intimate nook in the bedroom, the garden, etc.
  2. Use your nicest dishes, flatware, and glassware.  This helps set the "special" feeling of the evening!
  3. Mood music is key.  Put on a classic artist such as Eric Clapton or Sinatra.  Play a record for a special feeling.
  4. Avoid scented candles around your dining area.  Stick with unscented, white candles for a classic look. Make sure however the house does smell pleasant and the temperature is comfortable.  Take out the trash, change the litter box, etc.
  5. For romantic lighting, cluster your pillar candles for the perfect glow. Be sure they are no higher than 12 inches tall.  Scatter votive candles around the room to add ambiance and mood.
  6. Keep your menu fairly simple and prepare as much in advance to save your attention for your special guest.  This also keeps the kitchen relatively neat.  No one wants to spend the evening stuck doing dishes or looking at the mountains of dishes made from the meal.
  7. Make the meal three courses: appetizer, entree and dessert. This makes it feel more special than just a snack.
  8. Make sure you have a pitcher or glasses of ice water flavored with citrus fruits, cucumber, or even basil/mint in addition to wine or cocktails.
  9. Avoid messy and overly rich foods for the meal.  No one feels sexy when they are bloated or if they have greasy fingers from tacos.
  10.  Make sure your timing on the food is just right so everything is served at the correct temperature and time.  Be ready when your guest arrives.
  11. Before your guest arrives, go and dress up in a special outfit.  A nice dress or shirt and tie.  Remember this is a special evening, no PJs or baseball caps.
  12. Make sure to eliminate all distractions including technology, phones, pets, etc.  Send your cats or dogs for an overnight at the kennel or grandma's house.
  13. After your dinner is finished, dance together, watch a romantic movie, or maybe hand dip strawberries together.
  14. Our last tip, our favorite way to start and end a romantic, Valentine's dinner: Chocolate.
      • Chocolate Martini: Take a martini glass and drizzle hard shell ice cream coating on the inside of the glass.  Use both milk and white chocolate varieties to create a pattern. Next, in a shaker combine 3/4 cup half and half or light cream, 1 cup dark chocolate liquor, 1/4 cup vodka, with ice.  Shake to combine.  Strain into prepared glass.  Garnish with a conversation heart.
      • Flourless Fudge Cookies (Courtesy of King Arthur Flour): 
          • 2 1/4 cups confectioners sugar
          • 1/4 tsp salt
          • 1 tsp espresso powder (optional but divine)
          • 1 cup dutch process (preferred) cocoa powder
          • 3 large egg whites
          • 2 tsp gluten free vanilla extra (most pure vanilla extracts should be gluten free)
        • Pre-heat oven to 350 degrees.  Lightly grease two cookie sheet, or line them with greased parchment paper. Stir together all ingredients until smooth.  Scrap the sides and bottom of the bowl and stir again until smooth.  Drop the soft, batter like dough onto the prepared baking sheets in 1 1/2 inch circles.  Bake the the cookies for 8 minutes.  They should spread, become slightly shiny, and develop faintly crackly tops.  Remove from oven and allow to cool on the cookie sheets.  The result is an ultra chewy, rich chocolate cookie with no additional fat or gluten!


Sunday, January 5, 2014

Unconventional Wine Racks

Before you start this project, take a look around your home and decide what style of wine rack will accent your decor the best!  Often the first idea many of us think about when considering building an unconventional wine rack is to somehow gather a bunch of PVC piping together in some fashion using glue or screws.  This idea is wonderful but instead of just joining four tubes together in a square shape, give stab at something more artistic!  See the picture below!  The following ideas we have assembled take a more unexpected course!

1) If you would like to go for the PVC pipe look but want to try other materials, give these a try: black sub-pump lining, shiny aluminum duct, or coffee can with both ends removed.  You can gather these tubes together using airplane cable, large belt, rope, etc.

2) You could create a more organic wine holder by assembling terracotta chimney liners, bricks, or cinder blocks into a unique order!

3) Create a sling or hammock!  Use fabric such as canvas or duck cloth to create pockets in which bottles can be nestled.  You could also do this with belts!

4) Use wood! Find the space you would like to hang a wine rack in and determine whether you will need a 8-12 inch width board (the length of the board will be determined by your space).  Next, purchase several large hose clamps and gather several large coffee cans or soup cans (with both ends removed).  Draw parallel lines in several places along the length of board (approximately 6-8 inches apart). Screw the hose clamps (two at a time) to the board at each end of the parallel lines.  Secure the clamps around the cans and voila!  A vertical wine holder!   You can also drill smaller holes into a plank and stick the necks of the bottles in these smaller holes.

5) Try Tinker Toys or Legos for a fun, whimsical look!

6) A leather or canvas firewood carrier hung from the ceiling with chain or a sturdy pipe or rod could be slid through the handles.

7 ) A sturdy, in and out style mailbox/paper organizer.  Be sure the one you select can bear the weight of several wine bottles.  Check junk stores or antique shops for sturdy metal or wood ones.

8) A spare drawer will work!  Have an extra drawer in your kitchen or buffet (or ANYWHERE)?  Line it with foam and slip some wine bottles in it.

9) A wooden crate, antique or from the local craft store!  Paint, decorate, and divide!

10) Try an antique metal pail! Stencil, design, and voila!

Check out some pictures  of other great ideas below!


Thursday, December 5, 2013

Meal Of The Month: Turkey Left Over Ideas from Funky to Fancy


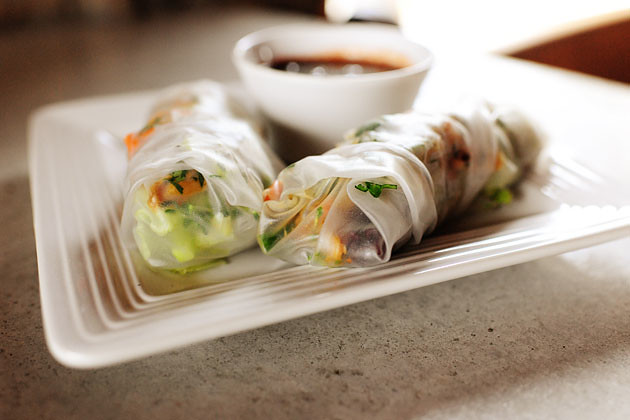
FUNKY: Turkey Spring Rolls
(Thank You Ree Drummond from the Food Network for the recipe)

Ingredients:
2 cups shredded leftover Thanksgiving turkey
3 tablespoons soy sauce
1 teaspoon sesame oil
1 teaspoon rice vinegar
1/2 teaspoon hot chile oil
1 package cellophane noodles
Eight 8 1/2-inch rice paper wrappers
3 leaves green-leaf lettuce, torn into pieces
1/2 cup alfalfa sprouts
1 carrot, cut into julienne
1 cucumber, cut into julienne
3 tablespoons finely chopped fresh cilantro

Dipping Sauce:
1 cup leftover cranberry sauce
2 tablespoons soy sauce
Hot chile oil

Directions
Place the turkey in a bowl and drizzle in the soy sauce, sesame oil, rice vinegar and the hot chili oil. Stir to combine and give it a taste. If you'd like a stronger flavor, add a little more of any of the ingredients.

Next, place the cellophane noodles in a large bowl. Cover them with boiling water and let them sit according to the package directions.

When they are tender but still have a nice bite, drain and set the noodles aside.

Soften the rice paper wrappers by placing them one by one into a bowl of warm water and taking them out when they're soft but still hold together.

To assemble each spring roll, lay a wrapper on a plate. Lay a small line of noodles in the center. Add a small amount of lettuce, turkey, alfalfa sprouts, a few carrot and cucumber strips, and top with a sprinkling of cilantro.

Fold in the sides of the wrappers and roll it into a tight roll. Repeat to make the rest of the rolls.

For the dipping sauce: Combine the cranberry sauce, soy sauce and a few dashed chile oil.

Dip the rolls into the sauce and dig in! Best if eaten within 1 hour of preparing.

Ree Drummond

FANCY: Leftover Turkey Pate

Ingredients:


  • 14oz cold cooked turkey
  • 1 large onion, chopped
  • 3oz butter
  • 4 tablespoons single cream (or light cream)
  • 2 tablespoons dry sherry
  • chopped parsley
  • salt and black pepper
  • lemon (as a garnish)
  • Directions

    1. Melt the butter in a saucepan, add the onion and fry until transparent.
    2. Remove pan from the heat and add the turkey meat.
    3. Place the mixture in a food processor and finely chop.
    4. Add the cream and sherry and beat until it is a smooth consistency.
    5. Place the mixture into a serving dish or individual ramekins and chill in the fridge for at least 3 hours.
    6. To serve, sprinkle with chopped parsley and place a lemon slice twist on top.

  • Celebrate Food Tip:
  • For this recipe, you can place some of your leftover, cooked turkey in the freezer to have on hand in case you have unexpected holiday company or if you have to bring something to a soiree!


Tuesday, November 26, 2013

Everyday Hair Gourmet!

Turn your bathroom into a salon with a trip to pantry (or fridge)!  Try this wonderful list of at-home hair treatments we have compiled for you.

1) Carrots:  Who would have thunk it?! If you have scarlet locks, you can revitalize and deepen your color with this produce staple!  Cut 2 large carrots into big chunks and boil in 2 cups water.  Turn down the heat and simmer until the water has a lovely orange glow.  Cool the water and remove the carrot chunks (We dying to know what would happen if you pureed it and used it as a hair mask including the carrot chunks!).  Pour the carrot water over dry hair.  Put on your favorite shower cap and wait 20 minutes.  Rinse and then use a mild shampoo and conditioner.  You'll look as radiant as your Christmas Tree!

2) Milk:  Add 1 tsp honey to 2 cups of warm milk.  If you have coarse hair use whole milk and if you have fine hair use skim milk!  Mix the ingredients until the honey dissolves and pour over dry hair.  After 15 minutes rinse with warm water and shampoo and condition as usual.

3) Almond Oil:  Frizzy hair?  This tip is for you!  To make a hair mask, combine a 1/4 cup of honey, 1/2 cup of plain yogurt, and a 1 tbsp of almond oil.  Blend the mixture and work it into your hair from the root to the tip.  Leave it on for 20 minutes and then rinse and shampoo.

4) Mayonnaise: To thicken your hair try a Mayo Mask!  Slather on approximately  a 1/2 cup of plain mayo over your hair from root to tip.  Let it sit for 30 minutes before shampooing.

5) Egg and EVOO:  Here is a tip to help prevent future split ends.  Make a hair mask by beating 1 egg yolk, 2 tbsps of olive oil, and 1 tsp of honey.  Massage in hair thoroughly.  Put on your trusty shower cap and let the mixture soak in for 30 minutes.  Rinse and shampoo.

6) Avocado: Have a spare sitting around after making guacamole?  Here is a great hair mask idea.  Mix mashed avocado with 1 tsp of olive oil and 1 tsp of honey.  Apply to your hair and leave for 20 minutes.  Rinse and shampoo.

7) Beer, Lemon Juice, or Vinegar:  Mix any ONE of these items with water (do not combine the three).  Apply AFTER shampooing as a rinse.  This will make your hair shine!

8) Papaya or Banana:  Both of these fruits are excellent for split ends!  Take the flesh of a fresh papaya (remove the skin and seeds) or a ripe banana.  Blend the fruit in a blender with 1/2 cup of yogurt, 1 egg yolk, 1 tsp of olive oil, and 1 tsp of honey.  Massage the mixture into hair and let it sit for 30 minutes.  Rinse and shampoo.

9) Epsom Salts:  Remove that greasy buildup with this great tip.  Mix 1 tbsp of salts with 1 cup of water.  Massage into hair.  Let sit and rinse well!

10) Coconut Oil:  Coconut oil is absorbed the best by your hair so try this tip.  Take a generous handful of coconut oil and work it through your hair root to tip.  Cover your hair with a shower cap and let the oil sit for 30 minutes.

*Use these recipes immediately after creating them so they won't spoil.

**Christmas is around the corner!  As a great gift for the hair lover in your family gather these ingredients into a gift basket and print or transcribe this list onto lovely paper to include with the present.


Thursday, November 14, 2013

Unconventional Cornucopia Corner

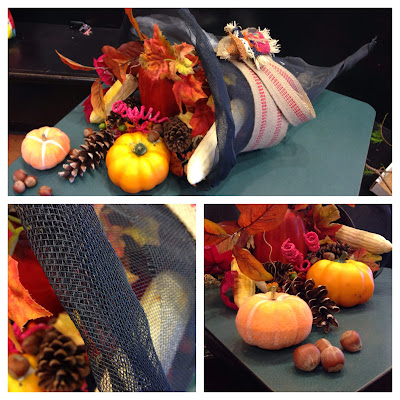
Our office challenge this week was to create a cornucopia out of unconventional materials.  Everyone took a stab at it!  Timothy attempted to construct his cornucopia out of cooked and braided spaghetti.  He failed.  Connie tried create a festive paste from glitter and craft glue.  She failed.  Wendell gave Lincoln Logs a try.  He failed.  Michael, who always answers "paper" when asked "paper or plastic?" destroyed several brown paper bags in his attempts.  While he came the closest of all the staff, he failed.  Finally Kathleen while pondering all the previous failures had a light bulb (compact florescent not incandescent of course, we're green) moment and drew a boxer cutter from her boot and cut the screen from the office outside door.  She then rolled it into a cone shape.  She secured the seams with staples (be careful).  Next, she trimmed the opening to make it even.  Kathleen then rolled the opening of the cornucopia to create a "cuff" to hide the rough ends and add structure to the opening.  Finally, she twisted the the narrow end into iconic upward horn shape of a cornucopia.   To help distract form any seams or overlap, she used striped jute strapping to create a rustic ribbon effect.  She finished her creation by rummaging through the office "Fall" Files for all sorts of appropriate fillings and fauna.  Needless to say the rest of the office staff was green with envy over Kathleen's creation and decided that it should be featured on the blog this week!  Below see pictures of her creation!

Wednesday, November 6, 2013

Thanksgiving Tablescape Extravaganza!

First, start off by collecting a supply of interesting fall bounty from Mother Nature like acorns, tiny pine cones, and dried leaves.  Add to this collection by picking up walnuts, gourds, corn husks, etc from your local grocery store. Next, spray paint everything metallic gold or if you have a specific color story whatever fits!  With these supplies you can make any of the following:
  • Napkin Rings: Glue acorns and leaves onto a small branch and affix a satin ribbon is a dot of hot glue.  You could also glue two acorns onto each end of a length of ribbon and tie into a casual bow.  You could affix star-anise (found in the spice aisle of your local grocery store) to lengths of ribbon as well.  These ideas are especially festive if your fold your napkin into a cornucopia/cone shape!
  • Place Cards: Tie a ribbon with a name "tag" onto a gilded gourd or mini pumpkin stem.  Take a fresh pomegranate (you don't have to gild this one) and pin a leaf shaped name tag to the fruit.  Take your gilded walnuts and wedge flag/pennant shaped card stock name tags into the seam between the shells.  Write the names in script for an extra fancy look. 
  • Trivia Turkey Place Cards:  Find a turkey pattern online.  Cut out the appropriate number for your expected guests from card stock.  Create a base by making a one inch cut into the bottom of the turkey cut outs and slip a corresponding cross piece into it.  This will create your traditional cross bar base.  Next create feathers by cutting colorful card stock with pinking shears and on each card write a Thanksgiving trivia question.  You can write the answers on the back side of each feather.   Affix card stock "feathers" to the turkey bodies with a brass paper fastener.  
Use any of your leftover gilding supplies to scatter around your table or group together on other surfaces such as your side board or entry table.

Try making these other festively fall table decor items!
  • Basket of Small White Gourds with Gold Stems: Wrap each stem in painters tape and spray paint the gourds white (or any color really).  Next remove the tape, and hand paint the stems metallic gold.  Arrange in a cornucopia, a rustic wooden bowl, or woven basket (turn it on it's side and "spill" the gourds out for a creative touch).
  • The Modern Approach to Painted Small Gourds/Pumpkins:  Wrap the stems of your gourds or mini pumpkins in painters tape and spray the surface in an array of matte colors.  You can go primary and bold or stick with modern takes on fall colors.  You can stack these colorful beauties in a glass cylinder.  You can also arrange them in a free standing tower.  First, collect 4-5 gourds or pumpkin  in progressively larger sizes.  Next, remove all the stems of the gourds except the smallest which will serve as the top of your tower.  Make sure the base gourd/pumpkin is flat bottomed to ensure your creation is steady.  Take a wooden skewer and press it through the center of the largest gourd, slide the next largest onto the skewer, and so on.  Finish with the smallest gourd/pumpkin with the stem intact on top.  You can make these in varied heights and cluster them in modern trios.
  • Sheaf of Wheat:  Gather approximately 100 stalks of dried wheat (This can be found at your local craft store).  Place a piece of floral wire down first onto your work table.  Next, place your bundle of wheat on top of the wire making sure the wire falls towards the top but below the grain pods.  Tap the top of the wheat pods gently to ensure they are even.  Next, secure the wire around the bundle.  Stand the bundle upright and begin to spread and turn the stems until you have a comfortably large base.  Tie a beautiful satin ribbon over the wire and let it drape along the stems. 
  • Gilded Turkeys:  Buy wooden or resin turkeys and spray paint with metallic gold paint.
  • Squash Gourd Candles: You can use things like acorn squash or other small round (like acorn) gourds.  Next, cut the top off of these gourds and then scoop out as much of the meat and seeds as possible.  You can use a melon-baller or sturdy spoon to achieve this.  Keep the inside smooth and follow the contours of the gourd because this will become your candle mold.  Next, melt old candles or wax with crayons for color and pour this into your gourd molds.  Sink a wick into the candles and drape excess wick over a knife or skewer placed across the opening of the gourd.  This will keep the wick centered.  Candle wicks can be purchased at your local craft store.    Let the wax harden completely (this may take several hours) and then break away the gourd mold.