Total Pageviews

Wednesday, September 25, 2013

MEAL OF THE MONTH: SEPTEMBER

Roasted Cauliflower Soup With Bacon & Thyme

2 heads cauliflower
1/4 cup olive oil
1 quart chicken broth
1 pint half and half
2 tsp chopped fresh thyme
10 slices apple wood smoked bacon (or 3 slices country ham) minced & cooked
Pinh of white paper
kosher salt

Heat your oven to 400 degrees and line a rimmed baking sheet with parchment or foil lightly misted with cooking spray.

Cut out and discard the core of each head of cauliflower and then cut off the heads into large florets.

Drizzle florets with olive oil and toss to evenly coat.  Next, sprinkle with 2 tablespoons of salt and toss again.

Arrange florets in a single layer on the prepared baking sheet and roast for 30 minutes.  Flip the florets and roast for an additional 30 minutes until deeply caramelized and golden.

Transfer roasted florets to blender and add 2 cups of broth.  Puree and then add half and half.  Puree for an additional 3 minutes or until smooth.  At this point the puree will be very thick.  With the blender running, add the remaining both, thyme, and white pepper.  Taste and adjust seasonings accordingly.

The soup can be transferred to a saucepan and gently heated.  It can also be refrigerated and reheated easily.  The flavor is best when allowed to rest overnight.


Gluten-Free Nutella Cheesecake Pots
(This recipe is in grams so use a kitchen scale)
Makes 6-8 ramekins.

Crust:

150g gluten-free graham crackers
50-60g butter, melted

Cheesecake:

390g cream cheese, room temperature
50g light brown sugar
90g Nutella
40g chocolate chips

In a food processor, pulse the butter and graham cracker until they form crumbs.

Scoop spoonfuls of the crust mixture into small ramekins or mugs.  Press down lightly, but not as much as you would a normal cheesecake.

Clean food processor thoroughly.

Next, pulse together the cream cheese, sugar, and Nutella until smooth.  Take a taste and add additional Nutella if you wish.

Add chocolate chips and pulse until ground into fine bits.

Divide the cheese cake between the ramekins.  Cover and chill for six hours or until set.

Remove from fridge and let set on the counter for 20 minutes before serving.

(Thanks to The Gluten Free Scallywag for this epic recipe.)


It's that good!


Monday, September 16, 2013

Roll The Tape, Timmy!

Here are a few EXCITING new uses for tape!!!

1) Electrical tape comes in a variety of colors these days, so when your are having guests over use your collection to tag drink cups to avoid awkward mix ups!

2) When you tighten your belt does the tail hang low? If it does, try some double sided "fashion" tape to keep it in place.

3) Protect your plaster!  When hanging your next family photo or piece of artwork place a piece of scotch tape on the spot where the nail will be driven.  It will prevent cracking and chipping.

4) Did you eat your Triscuits over your keyboard and now it is full of crumbs and stuff?  Try sliding a long piece of transparent tape between the rows of keys.  The sticky side will pick up dust and food particles in a jiff!

5) Does your luggage look like everyone else's at the airport?  Help make baggage claim easier by adding a unique strip of colorful or patterned duct tape to your bags to help them stick out!

6) Next time you have spare screws left over from assembling your latest IKEA find, try storing them between layers of clear packing tape.  You can even label your packets to make finding them in the future easier!

Bonus Random Tip:  Connie was trying to pour the glitter from our glitter station back into its respective containers.  It took her a week to organize the particles into color groups and she didn't want to mess up her work.  The office was fresh out of funnels that day so Wendell (always willing to be Connie's mindless slave) quickly folded over and rolled a piece of aluminum foil from our foil station into a gleaming, silver funnel!  Connie was thrilled and the next three months of glitter sorting was avoided.  Thank you Wendell!  We know what a snit Connie gets in when she is assigned glitter sorting duties.


Wednesday, August 7, 2013

Food Tip Round Up!!!

Here are some wonderful food/kitchen tips our research and development department have come up with!

  1. Flatten chicken breasts by placing them between two thin cutting sheets and pounding with a heavy skillet or sauce pan.
  2. A potato ricer works just as well if not better for juicing limes or lemons.
  3. Before juicing aforementioned citrus fruit, pop them in the microwave for ten seconds to optimize the juice!
  4. When cooking on the grill, place meat and veggies about 4" from the heat source and poultry 6"-8" away.  Don't forget dark meat takes longer to cook then white meat.
  5. Need to serve soup to the masses but don't have the proper serving dish, try pouring into an insulated ice bucket.  It works great for hot or cold soups.
  6. Contrary to popular opinion, do not add oil to your pasta water.  It will prevent the sauce from sticking!  You need the extra starch in the water, stir frequently for the first few minutes to keep the pasta separated.
  7. Don't overcrowd the pan when sauteing and searing meats and veggies.  You will end up steaming them instead of the desired effect.
  8. Fresh herbs, such as basil keeps better and longer at room temperature with stems in water.
  9. Season in stages to bring out the best in your ingredients and produce the most flavor.
  10. When cooking cauliflower add a splash of milk to the water.  It will keep the cauliflower bright white.  Shock it immediately by soaking it in ice water.
  11. Extend the life of your salad greens by wrapping them loosely in a damp paper towel and place them in a plastic, resealable bag.
  12. Store your onions and potatoes separately.  The gases released from onions will spoil your potatoes faster.
  13. For mashed potatoes, boil them, drain them, and return them to the hot covered pan for 5 minutes.  This steams them and dries them out.  When you mix in your butter and cream/milk, the texture will be perfect and the absorption spot on!
  14. Cook the perfect hard boiled egg every time!  Place your eggs in a pan of cold water just high enough to cover the eggs.  Next, bring the water to a boil.  As soon as the water boils, turn off the heat and cover the pan.  Set a timer for 15 minutes.  When the timer goes off, place the eggs in an ice bath for approximately 5 minutes or until the eggs are cool enough to handle.  Crack the shells completely on the counter.  The shells will peel off like butter and the yolks will be sunny yellow with no ugly greish green ring.


Sunday, July 28, 2013

Random Tip Round Up!!!

1.) Stop Loose Buttons in Their Tracks:  Avoid losing a button on your favorite button up shirts by coating the center of the buttons with a drop of clear nail polish.  Once it dries it will prevent the threads from fraying over time.  You can also tip unraveling ends of shoelaces in clear nail polish to seal them.

2.) Personalized Mugs In a Flash:  Adding a personal touch to your coffee cup has never been easier!  All you need is a plain, white, ceramic mug and a Sharpie marker.  Simply add your personalized message or design to the mugs exterior with the marker and bake in the oven at 350 degrees for 30 minutes!  Remember to hand wash the mug once personalized!  If you forget, no worries!  The worse that can happen is the design fades over time and you will simply need to touch it up and re-bake it!  The ideas are limitless!  Use a large array of colored Sharpie markers to make colorful designs.  These personalized mugs can make a great gift for friends and family!  They would make a stellar house warming present too!  Don't forget teachers too!

3.) Organize Your Kitchen Shelves In A Jiff:  Use a pair of short, spring loaded, adjustable tension rods to divide your shelves helping to coral all your platters, baking sheets, and cutting board vertically!  Remember, you'll need at least a pair for each division.


4.) Never Let Your House Plants Dry Out:  Breathe new life into old glass bottles by re-purposing them as watering globes!  Fill the bottles with water, invert them quickly, and stick them into the soil of your potted plants, hanging baskets, and container gardens.  Science and gravity will do the rest.  Refill as necessary.

5.) Clean Cut...Brownies:  To get a clean, crisp edge when cutting your next batch of brownies try using a disposable plastic knife while the brownies are still warm.  They will cut like butter!

6.) Don't Get Caught In A Sticky Situation:  Next time you find yourself with gum stuck on your clothing try this trick.  First remove the piece of clothing and place it in a sink or basin.  Boil some vinegar and pour it over the effected area while it is still hot.  Scrub vigorously and the gum should come off almost instantly! Use caution and common sense, don't burn yourself.


Sunday, July 7, 2013

MEAL OF THE MONTH: JULY


Hello to all our loyal listeners!!!  We are excited to be back after our mid-summer hiatus!  Everyone in the office took some much needed time off to travel and relax.  Timmy, spend his time off as lead camp counselor of Camp Hop To It, a survival camp for polliwog enthusiasts.  Connie went to Saudi Arabia to attend a women's rights conference.  Ironically she returned wearing a burka and refusing to drive.  hmm, strange!  Wendell went to tap dance camp and wants to "tap" a "liberated"Connie.  Kathleen spent vacation fishing in Fiji.  Finally Michael took a cruise to Novia Scotia (eh?).

Anyone can top a hot dog with ketchup, mustard, and relish but you can't top these great new ideas from our friends at Good Housekeeping Magazine!

1.) Pimento-Cheese Dogs:  Combine 1 1/2 cups shredded cheddar, 1/4 cup minced, jarred pimientos, 4 tbsp mayo, and 1/2 tsp of hot sauce.  This should cover 4 hot dogs!

2.) Everything Bagel Dogs:  Beat 3 tbsp cream cheese, 2 tbsp milk, 1/4 tsp salt until smooth.  Divide among 4 hot dogs and sprinkle with poppy seeds and 2 chopped green onions.

3.) Spicy Blue Cheese Dogs:  Combine 1 cup chopped celery, 1/4 cup mayo, 1/2 tsp cider vinegar, 1/2 tsp hot sauce, 3 ounces crumbled blue cheese.  Divide among 4 hot dogs.

4.) BLT Dogs: Divid 1/4 cup mayo, 1/2 cup sliced romaine, 1 chopped tomato, and 6 slices, crumbled, cooked bacon among 4 hot dogs.

You could explore some ideas we brainstormed here in the office:

- Grilled vegetables (Vermont Veggie Dog)
- Guacamole (California Dog)
- Coleslaw or potato salad (store bought or homemade) (Down Home Dog)
- Fresh salad ingredients such as cucumbers (Re-Fresh Dog)
- Nacho Dog: Top with crushed tortilla chips, salsa or queso sauce, and sliced, pickled jalapeno slices
- Bacon Dog:  Wrap your hot dog in slices of bacon and grill until perfection.
- Caprese Salad Dog: Top your dog with fresh, chopped mozzarella, chopped tomato, and basil.
- Shanghai Dog:  Saute shredded bok choy, carrots, and mushroom.  Mix with teriyaki sauce.  For an extra kick, add siraracha hot sauce!
- Mac N' Cheese Dog:  This one's for the the kids (or kids at heart).  Top your hot dog with left over macaroni and cheese and a thin, dill pickle slice.

Get grilling tonight!


Sunday, June 9, 2013

Picture This: Tips For Creating a Gallery Wall!

We have all seen a gallery walls in a magazines and envied their symmetry or perhaps their intentional eclectic mix of frames and sizes that just seems to work so perfectly!  Here are some tips that will help demystify and help you to create that perfect curatorial look!

  1. Plan Your Arrangement!  Avoid making too many unnecessary nail holes in your wall by first tracing your framed photos or art on paper.  You can then you can tape these to the wall and help play around with your arrangement before you commit!
  2. Space Them Out!  Do you want a cluster of art to read as one piece?  Do you want them to form a line across the room?  Let your arrangement dictate spacing.  Make sure they aren't too crowded but also not too far or else they will look sparse.  
  3. Theme It!  You can organize your collection in a number of ways.  The first being content.  All your artwork or photos can pertain to a particular item or memory for example a vacation to Cape Cod.  You can also organize your wall by the color story of the actual work being framed for example all the art/photography's primary color is green.  For this theme, you don't want the frames to distract from the overall color read of the grouping.  Finally, you can unite a collection of seemingly random art/photos by framing them all in the same colored frames.  Another way is to pick a variety of fun colored frames that work with the art but also enhance the over all experience.
  4. Mix It Up!  Use a wide mix of frame shapes and sizes.  Also hang items vertically and horizontally. Kick up the grouping by adding artifacts among the framed work.  
  5. Center It (If You Want To)!  You can be traditional and start with the piece you want in the center of the grouping and work out.  That said, rules are meant to be broken!  You could have a collection wrap around a corner, using that corner as the center.  You also could start near the ceiling with a small picture and work down the wall increasing the size of the work creating a pyramid effect.  
  6. Scale It!  Keep your work withing a balanced range.  If you want to incorporate a larger piece make sure the wall is large enough and you include other pieces of a complimentary scale.
Gallery wall in Michael's Apartment.  Michael used content to unit this grouping: Cape Code & Provincetown!

Sunday, June 2, 2013

Experimenting With Garden Whimsy!


 Last year, I decided to experiment with ways I could make my garden look a little more whimsical.  It was really to distract people from the weeds I wasn't ready to pull.  I started by buying a piece of 1/4 inch plywood at my local hardware store.  Then I drew some funky designs and cut them out using my band saw.  This was pretty work intensive to say the least.  After they were cut out, I painted the designs with acrylic craft paint and when I was finished, I screwed them onto a piece of  2x1 furring.  Unfortunately, I didn't leave a piece of the support showing at the top so when I tried to hammer them into the ground it was very difficult not to wreck the art work I had just created.  I also used a poly clear coat to help them weather the elements. Needless to say, next year I got wiser!


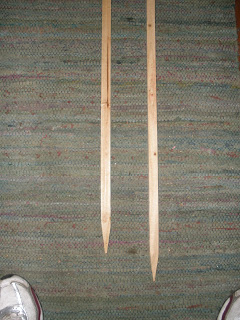
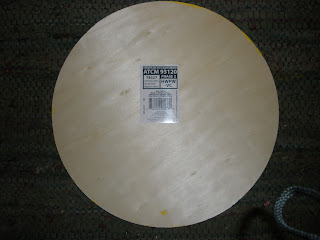
This year, I went to my local garden supply store and purchase pre-fabricated wooden stakes which come in various lengths.  I also visited my local arts and crafts store and picked up pre-cut plywood rounds to make my life easier and avoid the band saw.  (See both above)


Not having to use the band saw gave me a level of creative that I didn't experience with the previous incarnation.  It allowed me to add funky, geometric backgrounds and fanciful florals to my designs. 


 Notice that this time I left a "hammering" knob at the top of each so I could pound them into the ground easier and without ruining my artwork.  To achieve the crisp look, I outlined my work with a permanent marker such as a Sharpie.  Instead of screws to fasten the art to the posts I used small nails.  Goodbye drill!  To seal the artwork, this year I used a poly-spar (used for boats).  By making these improvements, it made the whole process faster and a lot more fun.  No more headaches!


Voila, the completed project!!!

- KATHLEEN